Cross-referencing is one of the most important aspects of dictionary compilation. Therefore, the DPS has a carefully designed system for handling cross-references. In this section you will learn:
Understanding Cross-References
Cross-references consist of two parts:
| 1) | The source: the text that appears in the dictionary and refers the reader to another location. |
| 2) | The target: the location referred to by the cross-reference. |
The source, in turn, consists of two parts:
| 1) | The metalanguage: the introductory text that describes the cross-reference. Typical examples might be 'see sense 3' or 'alternative spelling of judgment'. |
| 2) | The reference: the text that precisely defines what is being referred to: in the above example, 'sense 3' and 'judgment'. |
DPS uses the following rules to handle cross-references:
| • | Targets must be XML elements. |
| • | Each project defines its own list of XML elements that can be targets. |
| • | References are also XML elements. |
| • | Each project defines its own list of XML elements that can be references. |
| • | Each reference is linked by DPS to its target. |
| • | Links may be created and altered by users. |
| • | The content of a reference element is not controlled by users; rather, it is derived from the content of the target according to rules established by your DPS Administrator. |
| • | The content of the metalanguage is normal text. Depending on the project, it might be typed by the user or generated automatically (e.g. by a choice between different reference elements). |
Creating a Cross-Reference
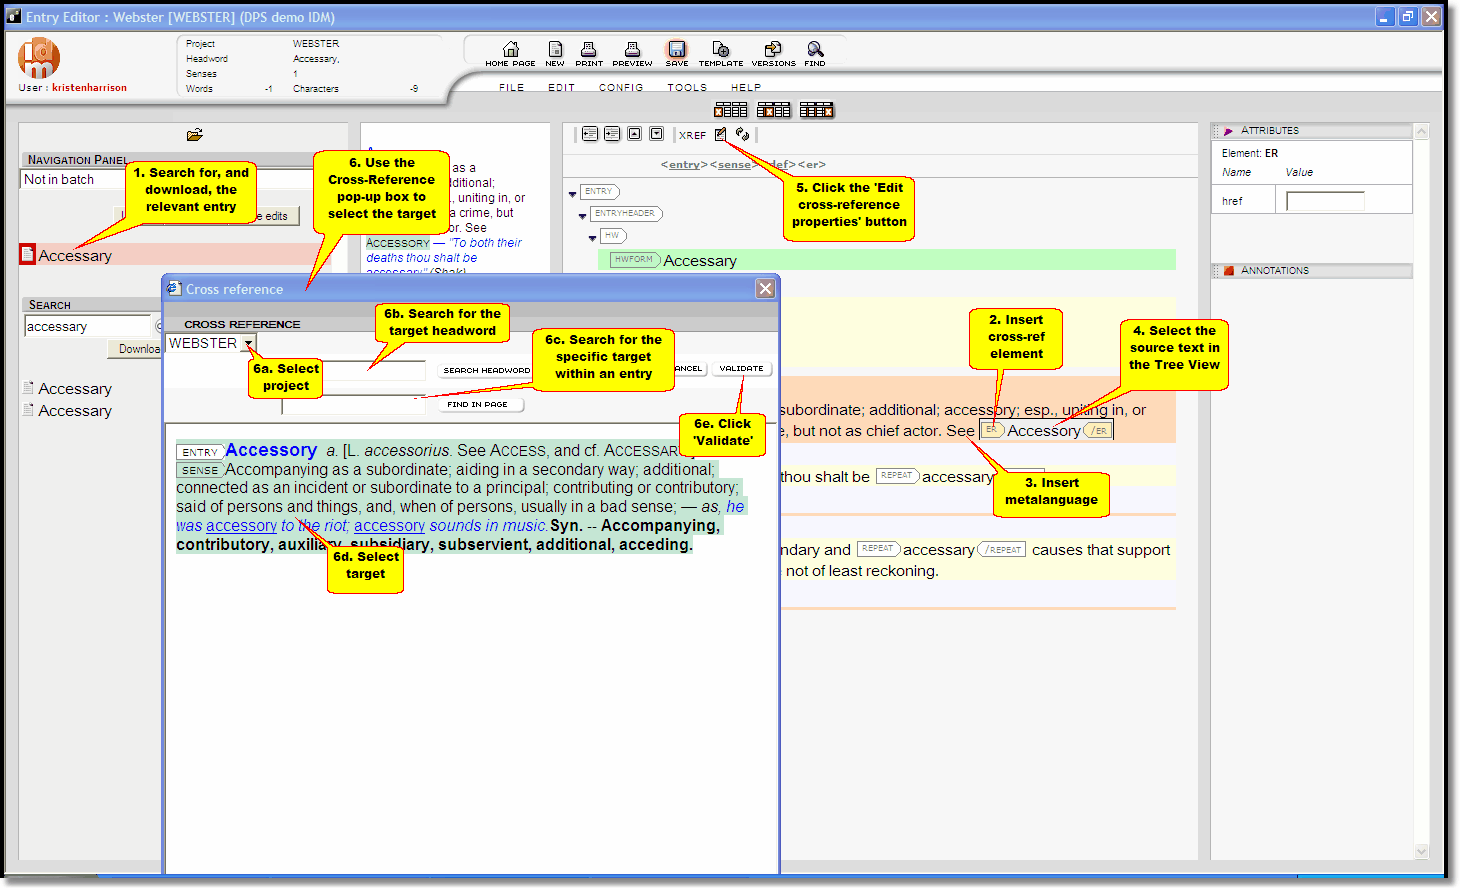
To illustrate this section we are using a hypothetical example concerning the alternate spellings of 'Accessory' and 'Accessary'. In this example we will insert the text 'See Accessory' into the entry 'Accessary'.
 |
| Click to enlarge |
| 1) | Search for the entry in which the source text will appear. In this case 'Accessary'. |
| 2) | Using the template picker or keyboard shortcuts, insert a reference element at the location where the cross-reference is to appear. |
| 3) | Enter the appropriate metalanguage, in this case we have just used 'See' but you could also use something like 'See also' or 'See alternate spelling'. |
| 4) | Select the reference in the Tree View Panel. |
| 5) | Click the Edit cross-reference properties button  at the top of the Tree View Panel. Note that this button is only active when a reference element is selected. It opens the cross-reference popup window. at the top of the Tree View Panel. Note that this button is only active when a reference element is selected. It opens the cross-reference popup window. |
| 6) | Use the Cross-reference window to identify the target: |
| a) | Select the appropriate project from the drop-down list (top left). This lists all projects in your repository, with the current project as the default. |
| b) | Select the target headword by typing it in the text box next to the Search Headword button and then clicking the button. |
| c) | The specified headword will be displayed in WYSIWYG form with eligible target elements manifesting. Find your desired target within the entry. (You can use the Find in page text box and button to help in this process, by searching for text within a long entry.) |
| d) | Click on the appropriate target to select it. |
| e) | Click the Validate  button to link the reference to its target. You will see the message 'Calculating XREF'. When this disappears the cross-reference has been created. button to link the reference to its target. You will see the message 'Calculating XREF'. When this disappears the cross-reference has been created. |
| f) | Or if you need to edit the target, use the Quick Edit button. |
 The DPS records the link, then refreshes the cross-reference. the content of the reference is replaced by content computed from the target.
To close the Cross-reference window without creating a link, click the Cancel  button.
Changing a Cross-Reference Target
| 1) | Select the appropriate reference in the Tree View Panel. |
| 2) | Click the 'Edit cross-reference properties button' (at the top of the Tree View Panel). This will open the Cross-reference popup window with the target's entry displayed and the target element highlighted. |
| 3) | Select a new target, using the Cross-reference window's facilities (described above). |
The DPS changes the link, then refreshes the cross-reference with content computed from the new target.
Deleting a Cross-Reference
| 1) | Using your usual method of editing, delete the appropriate reference element from within an entry. |
| 2) | Delete or otherwise clean up any metalanguage. |
Refreshing a Cross-Reference
The content of a reference depends on the target, so it is quite common for references to become outdated. For example, the headword 'about' might be reordered so that your cross-reference to 'about sense 3' should now be to 'about sense 4'.
To refresh the content of a reference:
| 1) | Select the appropriate reference in the Tree View Panel. |
| 2) | Click the 'Refresh cross-reference' button  (to the right of the 'Edit cross-reference properties' button ). (to the right of the 'Edit cross-reference properties' button ). |
Display of incoming cross-references
The entries pointing to the current entry are listed in the Incoming Xrefs section. The section is divided in two:
| • | Main: this displays the entries pointing to the currently selected element. |
| • | Descendants: this displays the entries pointing to a descendant of the currently selected element. |
So to see all links to the current entry - either to the root element or to an element (sense, phrase ...) within it, the root element should be selected - as it is when opening the entry. The target elements are identified by a dark-blue triangle.
Each link allows:
| • | To position on a target element, click the text of the link. |
| • | To see the source entry, click the triangle. |