Most dictionary projects begin with raw data (e.g. an old edition of a text) that the editors will work from to create a new edition. However, sometimes it is necessary to insert completely new content. There are three types of new content available in the DPS: XML Elements, System Templates and User Templates. In this section you will learn:
Accessing the Template Picker
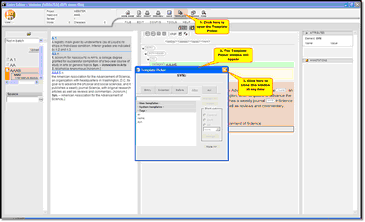
Accessing, creating and inserting Templates is done via the Template Picker. There are three ways to access the Template Picker window:
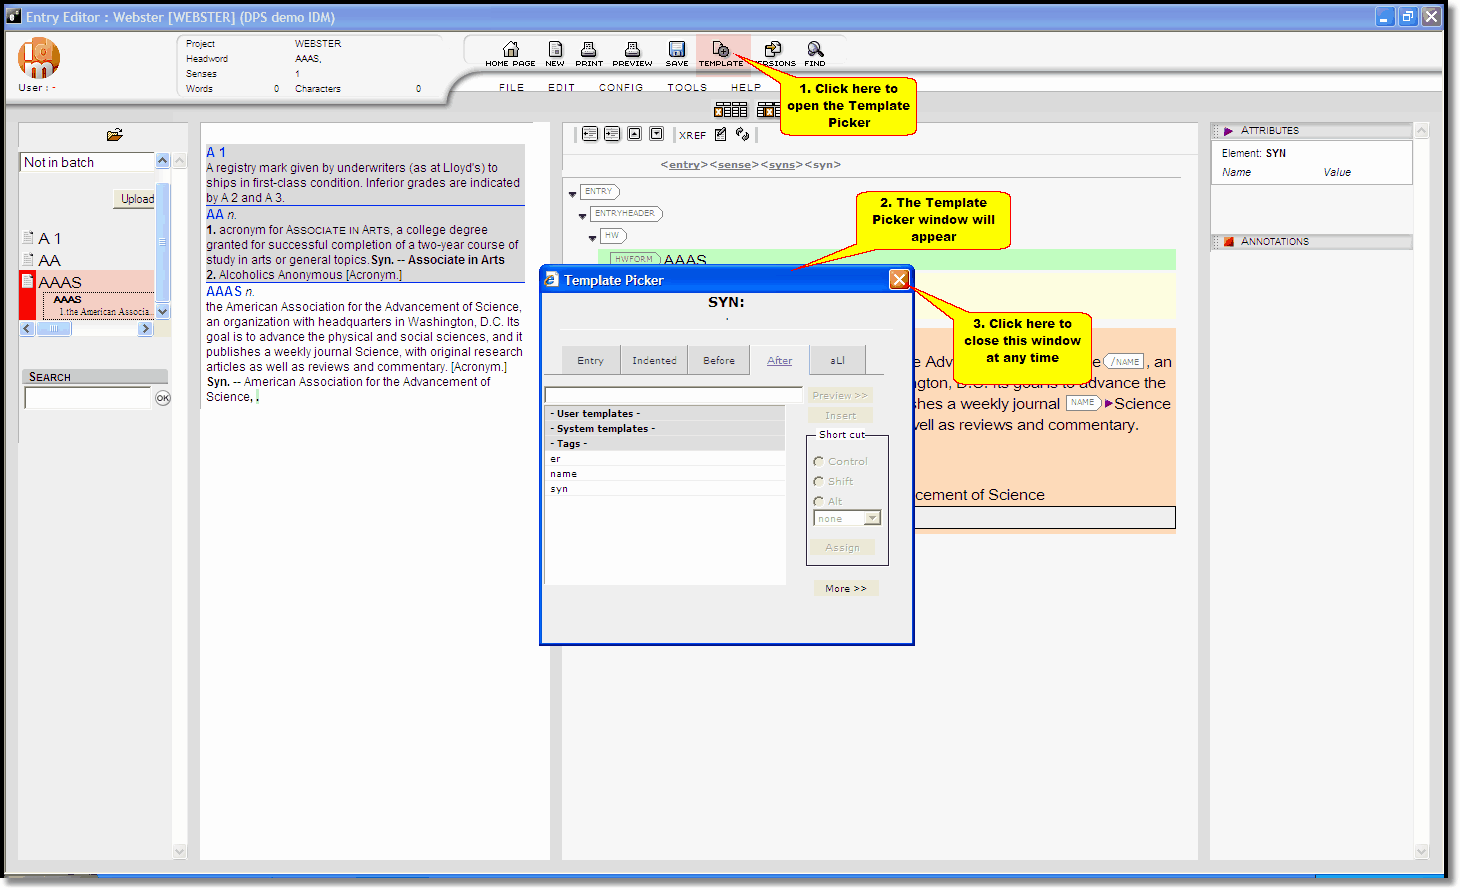
| 1. | Click the Template  button in the main menu at the top of the Entry Editor screen: button in the main menu at the top of the Entry Editor screen:
 | | Click to enlarge |
|
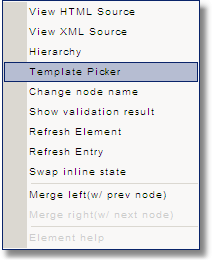
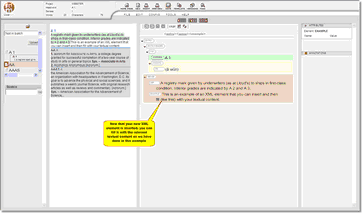
| 2. | Place the curser in the part of the entry where you want the template to be inserted, then right-click your mouse and choose 'Template Picker':
 |
When you have opened the Template Picker (using methods 1 or 2 described above) you will see this window:
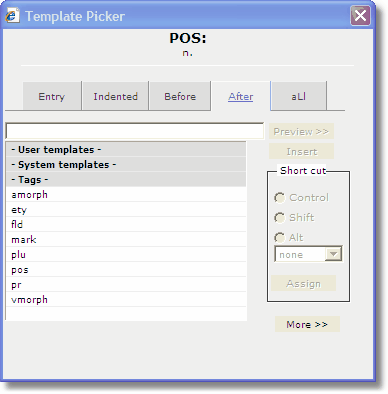
Please see Template Picker screen (in Appendix 4) for a full description of the Template Picker window. Here we will concentrate on the aspects of the screen most relevant to editors and lexicographers:
| 1) | Any User Templates that you have created will be listed under '-User templates-'. |
| 2) | Any System Templates available to you will be listed under '-System templates-'. |
| 3) | The tabs across the top of the Template picker allow you to select where you want to insert the template. Within this documentation we refer to these as the Insertion Locations. See the Insertion Locations section below. |
| 4) | The shortcut panel is greyed-out in the screenshot above, but this will become available when you select a specific Template. You can then create your own shortcuts for convenience. |
 Note that the Template Picker will only display those options relevant to the current element. In addition, you will only see elements that are allowed to be inserted according to the DTD.
Types of Insert-able Content
There are three types of new content that you can insert:
| 1) | XML Elements: A single XML element (such as pronunciation, sense or definition) that can be inserted in a specified location. (See Inserting a Single XML Element.) |
| 2) | System Templates: A set of XML elements, with or without textual content, that often need to be inserted together. For example, let's say you are working on a standard English dictionary where every entry contains the following core elements: headword, sense number, pronunciation, definition. Your System Administrator can create a template of these core elements so you can quickly insert them as a group, at any time. System Templates can be accessed by all Users. (See Inserting System Templates.) |
| 3) | User Template: As with a System Templates, a User Template is a set of XML elements that can be inserted together, but the difference is that you can create User Templates yourself. User Templates allow you to create your own groups of elements and they can only ever be accessed by you. (See Creating User Templates and Inserting User Templates.) |
Each of these areas is covered below in detail. Ensure you are clear on each type of new content as these tools can greatly improve your efficiency.
Insertion Locations
'Insertion Locations' determine where your new data is placed. Your System Administrator will have created rules (which are established by the publisher) within the DTD that ensure content is placed in the correct place and order. For example, if you are producing a dictionary where every headword must be immediately followed by a pronunciation label, the system will alert you if you try to place any other sort of label after the headword.
There are five insertion locations:
| 1) | Entry: The new content is a new entry, which is placed as soon as possible after the current cursor position. When Entry is selected, only templates that can form a valid entry are shown. |
| 2) | Indented: The new content is inserted within the current element and becomes its last child. Note that, although the template picker only lists elements and templates that are permitted as children of the current element, it does not ensure that they are inserted in the correct position or order. |
| 3) | Before: The new content is inserted immediately before the current element and becomes its preceding sibling. Note that the template picker lists all elements and templates that are permitted as siblings of the current element, as well as the current element itself; but it does not ensure that they are inserted in the correct position or order. |
| 4) | After: The new content is inserted immediately after the current element and becomes its following sibling. Note that the template picker lists all elements and templates that are permitted as siblings of the current element, as well as the current element itself; but it does not ensure that they are inserted in the correct position or order. |
| 5) | aLl: The new content is inserted immediately after the current element and becomes its following sibling. The Template Picker lists all defined elements and templates, regardless of whether or not they are permitted as siblings of the current element. Use with extreme caution. |
Inserting a Single XML Element
An XML element is a single component of your data hierarchy, for example a headword, pronunciation, phonetics or definition label. The DPS allows you to insert a single XML element at a specified location, without any textual content. When you open the Template Picker you will only be show the Insertion Locations that adhere to the DTD and your editorial style rules.
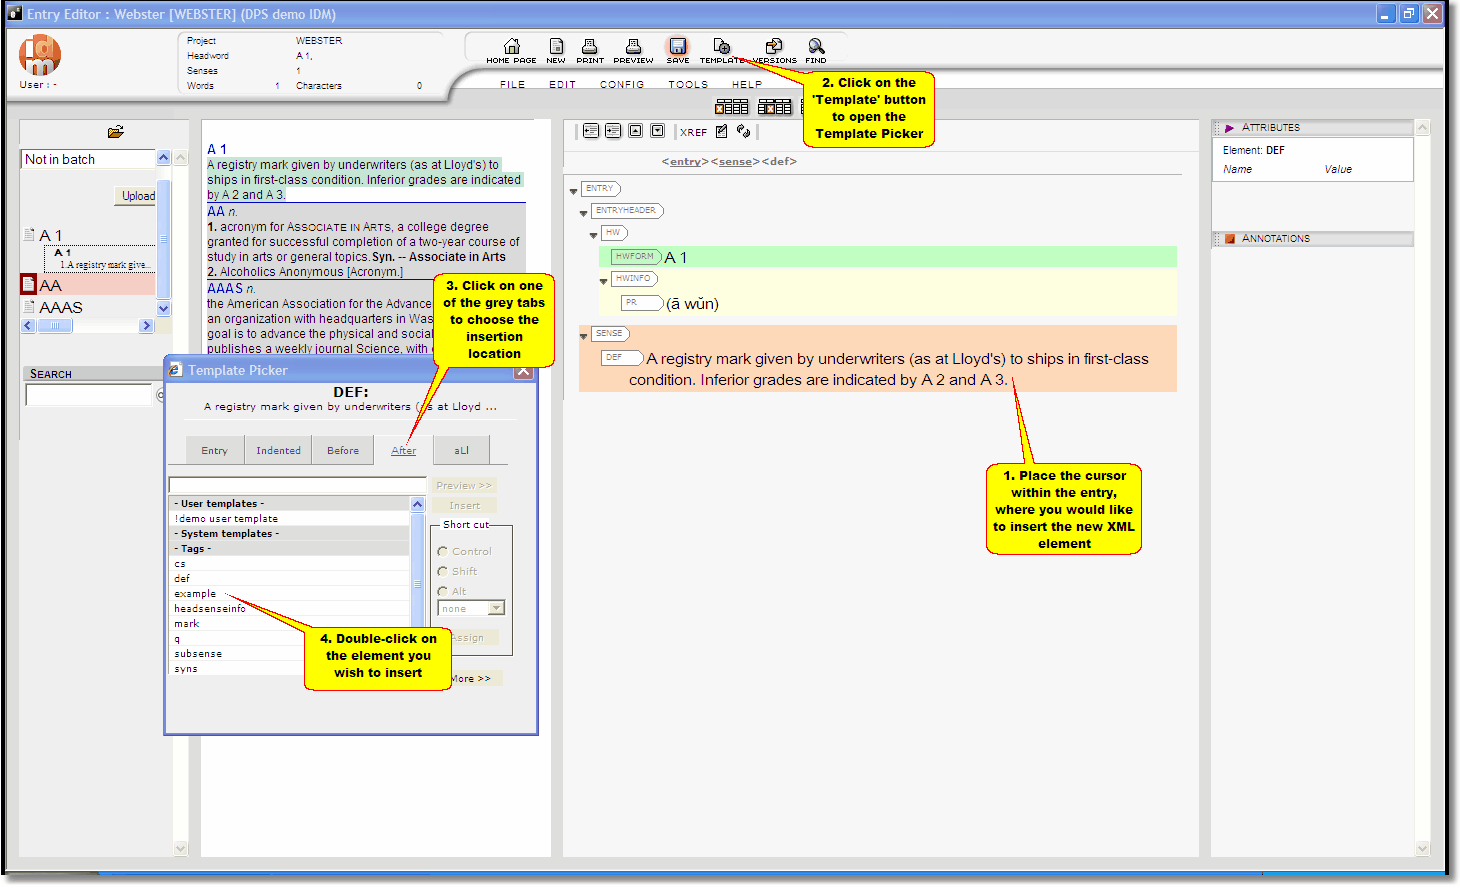
To insert a single XML element:
 |
| Click to enlarge |
| 1) | Click on the area of the entry where you would like to insert the element. |
| 2) | Select an insertion location by clicking the appropriate grey tab at the top of the Template Picker. |
| 3) | Select the element to be inserted then click the 'Insert' button. Or, double-click on the element to be inserted. |
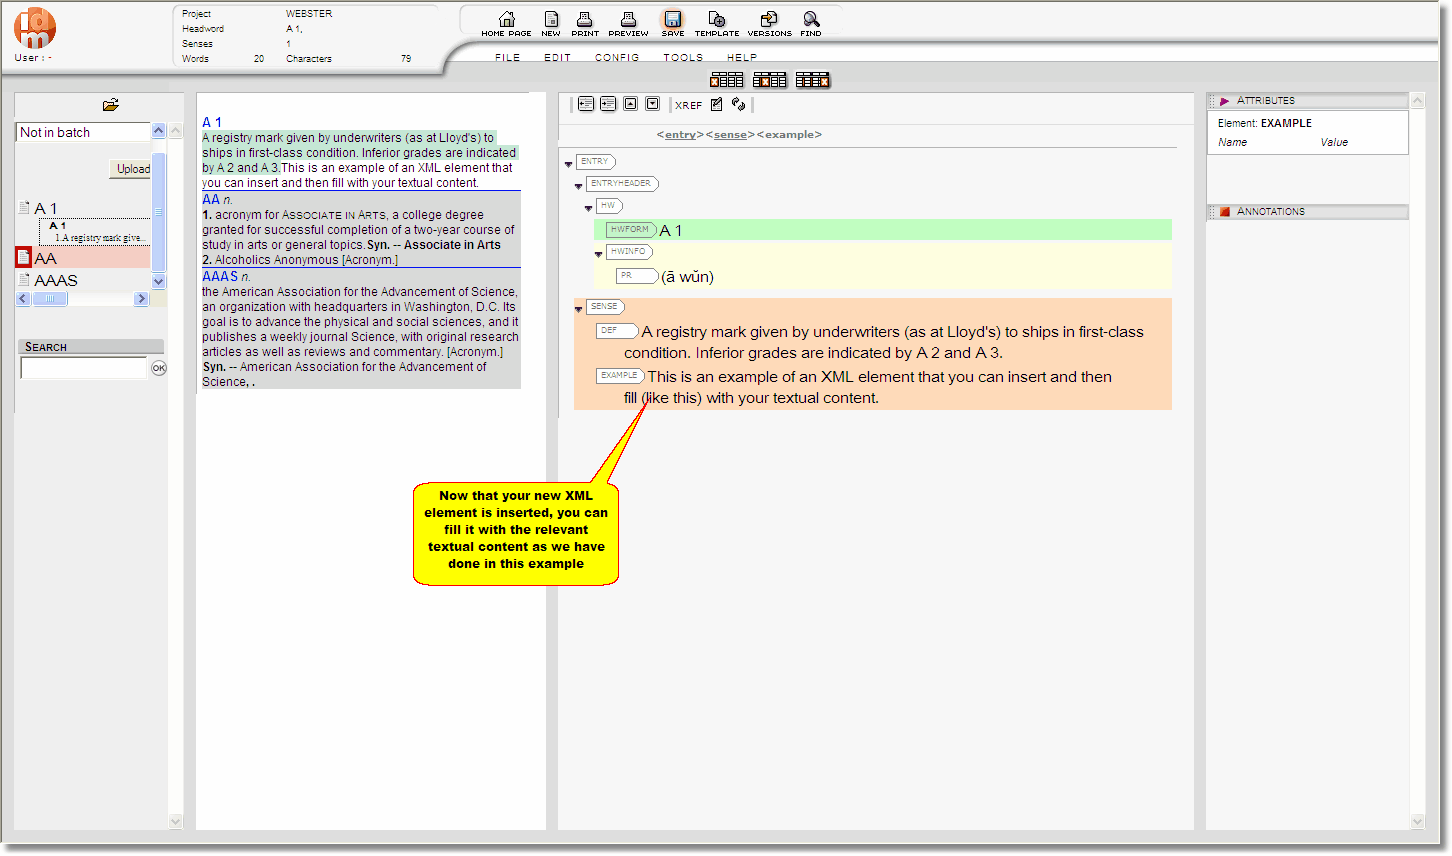
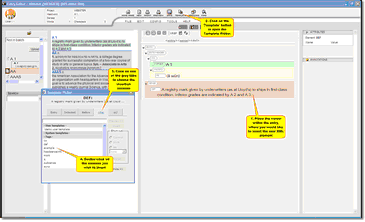
| 4) | The Template Picker window will automatically close and you will return to your entry, with the new XML element inserted:
 | | Click to enlarge |
|
Note that inserting new content in this way will insert an empty XML label for you to fill in the textual content manually.
Inserting System Templates
A system template is a template that has been defined by your System Administrator for the current project and these templates are available to everybody working on the project. Any such templates are listed in the Template Picker under the '-System Templates-' heading. Their name always begins with an exclamation mark (!), to distinguish them from XML elements.
To insert a System Template, use the methods described above to access the Template Picker, then select your System Template from the list.
Note: Users do not have permission to create System Templates as these templates are defined by System Administrators. If you are a System Administrator and would like instructions for creating System Templates you should consult the  provided by IDM.
Creating User Templates
A User Template is a template that has been defined by you and is not shared with anybody else. You can create any templates you find useful but they will need to be compliant with the DTD/editorial rules for your project. User Templates are listed in the template picker under the '-User Templates-' heading.
To create a new User Template:
 |
| Click to enlarge |
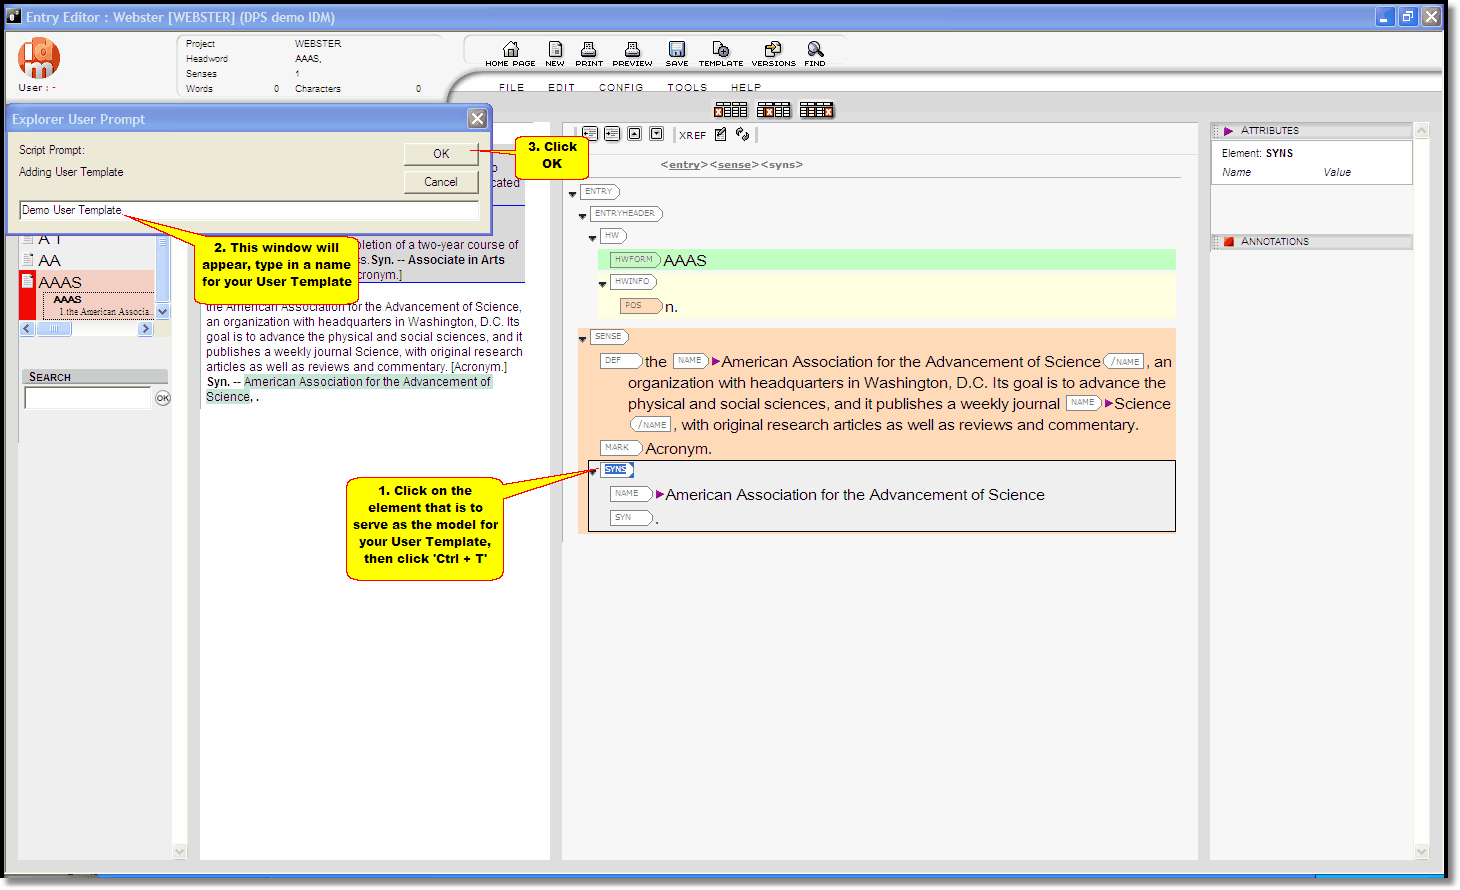
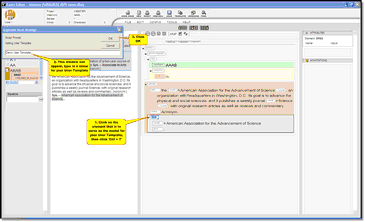
| 1) | Click on the XML element that is to serve as a model for the template. |
| a) | Ctrl + T: creates a template containing the selected element and its descendants, but without their textual content. |
| b) | Ctrl + Shift + T: creates a template containing the selected element and its descendants with their textual content. |
| 3) | A popup dialog appears for you to give the new template a name. Specify the desired name, which must be unique. (The popup suggests a name that is guaranteed to be unique but is not very informative: for example, 'User Template 1190128803015'. Feel free to accept these recommendations, but only if you are willing to record your Template Names, or if you have a very good memory!) |
Inserting User Templates
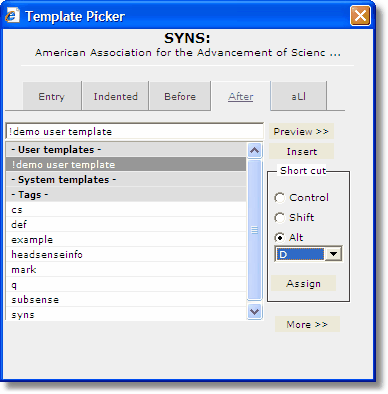
Once you have created your own User Template, you will find it listed in the Template Picker under '-User Templates-'.
To insert a User Template, access the Template Picker as described above in Accessing the Template Picker, then simply click on your chosen template to insert it. Alternatively, you can use the Template Picker to create your own Keyboard Shortcuts, then use this shortcut from within an entry to insert your template. Note that the template will be inserted wherever the cursor is.
Keyboard Shortcuts
The DPS System has a standard set of Keyboard Shortcuts available, specifically designed for the Template Picker. See Appendix 2 for a full printable list of Keyboard Shortcuts for the Template Picker.
Creating Your Own Keyboard Shortcuts
You can create keyboard shortcuts for your own User Templates using the Template Picker:
| 1) | Access the Template Picker as described at the beginning of this chapter. |
| 2) | Click on the User Template you wish to create a shortcut for. |
| 3) | Using the 'Short cut' dialogue box on the right-hand side you can determine what you want the shortcut to be:
 |
| 4) | Simply close the Template Picker window when you are finished. |