|
Entry Editor Menus and Buttons |
  
|
| Show/Hide Hidden Text |
|
Entry Editor Menus and Buttons |
|
| Show/Hide Hidden Text |
The layout of the Entry Editor Screen is described broadly in the Main Entry Editor Screen section of the Entry Editor chapter. Here we will look in more detail at the menus and buttons available within the Entry Editor.
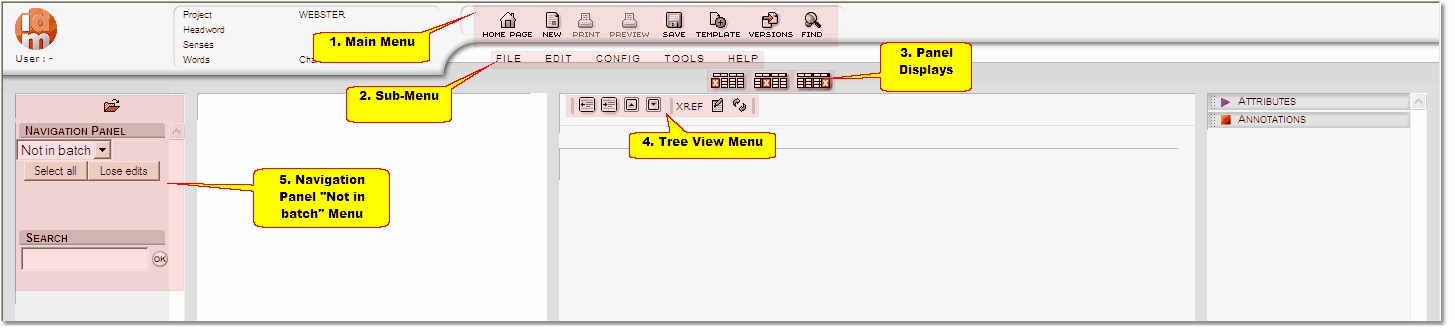
When you launch the Entry Editor the first screen you will see is the Main Entry Editor Screen. This screen has several different menu 'clusters':
 |
| Click to enlarge |
The Main Entry Editor toolbar is positioned at the top of the screen. The available options are:
Icon |
Name |
Description |
|
Home Page |
Opens the Entry Editor Home Page. The Entry Editor's home page is essentially a summary of the progress on all the batches assigned to you from all projects in the current repository. |
|
New |
Creates a new entry. The Template Picker is automatically displayed showing those templates suitable for creating new entries. If you are working on a Batch, the new entry is added to that Batch. |
|
Opens a standard Windows print dialog window, from which you can print the current entry. The printed output emulates the formatting of either the WYSIWYG View Panel or the Tree View Panel, depending on which panel you were working in when you clicked the Print button. Shortcut: CTRL+P. |
|
|
Preview |
Opens the Print Preview window. |
|
Save |
Saves changes to the current entry. Only the working copy of the entry on your computer is updated; the DPS Repository is not updated until you upload the entry. Note that the current entry is automatically saved whenever you move to a different entry (i.e. whenever a different entry appears in the Tree View Panel). The Save button is intended for intermediate saves if you are doing time-consuming work on an entry. Shortcut: CTRL+S. |
|
Template |
Opens the Template Picker. |
|
Versions |
Opens the Entry Editor's Version Manager. |
|
Find |
Opens the Search dialog window. |
2. Sub-Menu
The Sub-Menu is located under the main menu. Clicking on any of the sub-menu options will bring up a drop-down list of further options:
| 1) | New: Creates a new entry. The template picker is automatically displayed showing those templates suitable for creating new entries. If you are working on a batch, the new entry is added to that batch. |
| 2) | Discard/Restore: The entry or entries currently selected in the Navigation panel are either: |
| a) | Marked to be discarded: that is, deleted from the project. Entries so marked are indicated by a 'D' on the right-hand side of the Navigation panel. When these entries are uploaded to the DPS Repository, they are discarded: that is, deleted from the project. (Their data is not physically destroyed. The entries are moved to a special area and can be restored if necessary by your DPS Administrator.) |
| b) | Have their discard mark removed, if they are already so marked. |
![]() Note that you can continue to edit entries that are marked to be discarded.
Note that you can continue to edit entries that are marked to be discarded.
| 3) | Download: Downloads the entry or entries currently selected in the Navigation panel. |
| 4) | Lose Edits: Unlocks the entry or entries currently selected in the Navigation panel and deletes them form your local store. |
| 5) | Upload: Uploads the entry or entries currently selected in the Navigation panel. |
| 6) | Upload All: Uploads all the downloaded entries in the batch currently displayed in the Navigation panel. |
Edit
| 1) | Undo: Undoes changes made to the current element's data. Shortcut: CTRL+Z. |
| 2) | Redo: [Inactive option] |
| 3) | Repeat: [Inactive option] |
| 4) | Cut: Cuts textual data (not XML elements) to the clipboard. Shortcut: CTRL+X. |
| 5) | Copy: Copies textual data or the current XML element and its descendants to the clipboard. Shortcut: CTRL+C. |
| 6) | Paste: Pastes textual data or an XML element from the clipboard. Textual data is inserted at the current cursor. An XML element (and its descendants) is inserted inside the current element; it becomes the current element's last child. Shortcut: CTRL+V. |
| 7) | Paste After: Tree view panel only. Pastes an XML element (and its descendants) from the clipboard after the current element; it becomes the current element's following sibling. Shortcut: CTRL+W. |
| 8) | Paste Before: Tree view panel only. Pastes an XML element (and its descendants) from the clipboard to before the current element; it becomes the current element's preceding sibling. Shortcut: CTRL+Y. |
| 9) | Paste Inside: Tree view panel only. Pastes an XML element (and its descendants) from the clipboard inside the current element; it becomes the current element's last child. Shortcut: CTRL+V. |
| 10) | Delete: Tree view panel only. Deletes the current element. Shortcut: CTRL+Delete. |
| 11) | Collapse/Expand All Elements: Tree view panel only. Shortcut: SHIFT+F9. Either: |
| a) | Collapses the tree view of the current element so that its descendants are not visible. |
| b) | Expands the current element (if it is already collapsed) so that all its descendants are visible. |
Config
| 1) | Repository: Displays the 'Select a Repository' dialog box, allowing you to change DPS repositories. You must shut down and restart the Entry Editor for your choice to take effect. |
| 2) | Logout: Logs you out from the current Repository. You can continue to work with the Entry Editor offline and, if you need to access the Repository, you are automatically logged in again. Note that the Entry Editor remembers your current login details; you must shut down and restart the Entry Editor if you wish to log in as a different user. |
| 3) | Entry Map: Allows you to choose between available formats for the Navigation Panel. |
| 4) | Tree View: Allows you to choose between available formats for the Tree View Panel. |
| 5) | Formatted View: Allows you to choose between available formats for the WYSIWYG View Panel. |
| 6) | Synchronize Views: Controls whether the cursor position and changes made in either the Tree View Panel or the WYSIWYG View Panel are automatically updated in the other panel. Select the option to toggle between 'on' (the option is ticked) and 'off' (no tick). |
Tools
| 1) | Highlight DTD Errors: Highlights errors in the current entry's XML structure by placing a red box around the offending element(s) in the WYSIWYG View Panel and Tree View Panel. Shortcut: F4. |
| 2) | Selecting the 'Highlight DTD Errors' menu option again removes the highlighting. |
| 3) | Report DTD Errors: Opens a popup window that gives a detailed report on the errors in the current element and its descendants. |
Help
| 1) | Project Help: Opens online help for your current project. This menu option is inactive if such a facility has not been provided for the current project. |
| 2) | About Entry Editor: Opens a popup window showing the exact version of the Entry Editor you are using. |
Right-Click Context Menu
Use the right-click on your mouse to bring up these menu items. All these menu options operate on the element currently selected or containing the cursor in the Tree View Panel.
| 1) | View HTML Source: Shows the HTML code for the current element, as created by the Entry Editor for display purposes. (You will probably never need to use this option except under instruction to resolve a technical problem.) |
| 2) | View XML Source: Shows the XML code for the current element, as manipulated by the Entry Editor for display purposes. (You will probably never need to use this option except under instruction to resolve a technical problem.) |
| 3) | Hierarchy: Opens a message box showing the position of the current element in the element hierarchy. |
| 4) | Template Picker: Opens the Template Picker. |
| 5) | Change Node Name: Opens a popup window that allows you to change the name of the current element. To change the element's name: |
| a) | Specify the new name, either by selecting it from the list provided or by typing it in the text box. |
| b) | Tick the Discard irrelevant attributes if appropriate. (In most cases you will need to do this as leaving attributes relevant to the old element, but not to the new element, will cause validation errors.) |
| c) | Click the Change button. |
| 6) | Show Validation result: Same as menu option TOOLS/Report DTD Errors. |
| 7) | Refresh Element: Refreshes the display of the current element. This option is useful if the WYSIWYG View Panel and Tree View Panel have become unsynchronized. |
| 8) | Refresh Entry: Refreshes the display of the whole of the current entry. This option is useful if the WYSIWYG View Panel and Tree View Panel have become unsynchronized. |
| 9) | Swap Inline State: Elements whose only contents are other elements are normally displayed in the Tree View Panel in a tree-like fashion. However, it might be more useful to view them as continuous text (the so-called 'inline' view). This menu option toggles inline view of the current element on and off. |
| 10) | Merge Left (w/ Previous Node): Delete the current element, but not its children. Its children are merged with those of the deleted element's preceding sibling (they become its last children). |
| 11) | Merge Right (w/ Next Node): Delete the current element, but not its children. Its children are merged with those of the deleted element's following sibling (they become its first children). |
| 12) | Element Help: Displays online help for the current element. This option is disabled if such a facility has not been set up for your project. |
3. Panel Displays
These icons represent the three panel displays in the Entry Editor window. Click on any of them to add/remove that panel from your display. This function can be used at any time.
![]()
![]()
![]()
4. Tree View Menu
Icon |
Name |
Description |
|
Left Arrow |
Move the current element in the Tree Panel View up one level in the element hierarchy; it becomes the following sibling of the element that was its parent. Shortcut: CTRL+Left arrow. |
|
Right Arrow |
Move the current element in the Tree Panel View down one level in the element hierarchy; it becomes the last child of the element that was its preceding sibling. Shortcut: CTRL+Right arrow. |
|
Up Arrow |
Swap the positions of the current element in the Tree Panel View and its preceding sibling. Shortcut: CTRL+Up arrow. |
|
Down Arrow |
Swap the positions of the current element in the Tree Panel View and its following sibling. Shortcut: CTRL+Down arrow. |
|
Edit Cross-reference Properties |
Opens the cross-reference popup window. This button is only active when the element selected in the Tree View Panel is a reference element. |
|
Refresh Cross-reference |
(The 'circular arrows' icon on the right.) Refresh the content of the element selected in the Tree View Panel. This button is only active when this element is a reference element. |
5. Navigation Panel 'Not in batch' Menu
If you do not have any entries selected or downloaded, the Navigation Panel will contain the default menu options for 'Not in batch'. The options within this 'Not in batch' menu are:
| 1) | Select all |
| 2) | Lose edits |
| 3) | Upload (note that the Upload button only appears if you have permission to upload modified entries directly to the project database. If you do not have this permission, any entries in 'Not in batch' are read only and the Upload button is irrelevant). |
Once you have conducted a search in the Search Box you will be given the following options:
| 1) | Select all |
| 2) | Download |
Navigation Panel: Batch Buttons
These buttons appear immediately below the Navigation Panel title bar and apply to the batch you are currently working on. These options will only appear when you have downloaded your batch to the Entry Editor. If you have no batch downloaded you will only see the default 'Not in batch' options. See also Navigation panel 'Not in batch' Menu.
Download
Downloads the selected entries (i.e. those highlighted in the Navigation Panel) and loads them into the Entry Editor. If some of the entries you select are already downloaded, they are ignored and the rest are downloaded. Clicking this button does nothing if all the selected entries are already downloaded.
Upload
Uploads the selected entries (i.e. those highlighted in the Navigation Panel) and if appropriate submits them. If some of the entries you select are not currently downloaded, they are ignored and the rest are uploaded. However, attempting to upload only entries that are not currently downloaded will give the warning message 'There is nothing to do with the selected entries'.
Comments
Displays any comments attached to the selected batch by your Project Manager in a popup window. If there are no such comments, the warning message 'No comments entered' is displayed.
Stats
Displays statistics about the current batch.
These statistics summarize tag (aka XML element) usage in the batch's entries, comparing the versions you are editing (heading Editor, on the right) against the current versions in the DPS Repository (heading Database, on the left).
![]() Note:
Note:
| • | The Stats function requires that all entries in the batch be downloaded. If this is not the case the warning message 'Some entries are not downloaded' will be displayed and no statistics will be shown. |
| • | Any new entries you have created must have been uploaded at least once, so that they exist in the DPS Repository. If this is not the case the warning message 'Some entries don't exist on the server. You must upload them first.' will be displayed and no statistics will be shown. |
| • | The Editor statistics ignore any entries in the batch that have been submitted and accepted. |
| • | Be warned: computing these statistics is not a quick process! |
Select All
Selects all the entries in the current batch.
Toggle Status
Toggles the submission status of the selected entries. If no entries are selected, the warning message 'Select the entries you want to change' will be displayed.
Lose Edits
Unloads the selected entries from the Entry Editor and your computer's local data store, losing any changes you have made to them.
Typeset
Gets a typeset document of the entries in your current batch, if such a facility has been configured for your project.
![]() Notes:
Notes:
| • | It is the versions of your batch's entries in the DPS Repository that are typeset, not the (possibly modified) versions you are working on in the Entry Editor. |
| • | Any new entries you have created must have been uploaded at least once, so that they exist in the DPS Repository. If this is not the case the warning message 'Some entries don't exist on the server. You must upload them first' will be displayed and no typeset document will be produced. |
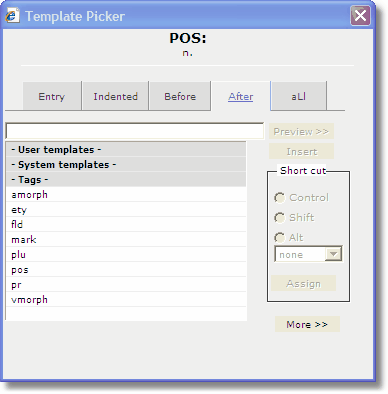
The Template Picker window is made up of various options:
Menu |
Description |
Entry |
Insert a template for an entire ENTRY |
Indented |
Insert a template INDENTED into an existing element |
Before |
Insert a template BEFORE an existing element |
After |
Insert a template AFTER an existing element |
ALI |
Lists ALL Available templates |
-User templates- |
Templates created by you, for your own use, will be listed under this heading |
-System templates- |
Templates created by your Administrator, for use by everyone working on the project, will be listed under this heading |
-Tags- |
Tags allowing you to 'tag' and subsequently search for entries will be listed under this heading |
For more information about Templates see The Template Picker (Inserting New Content) in The Entry Editor section.
For more information about Tags see Tags, in the Features for Advanced Users section.