|
Screen Layout |
  
|
| Show/Hide Hidden Text |
|
Screen Layout |
|
| Show/Hide Hidden Text |
This section describes the layout of the main Entry Editor screen, which is the first screen you see when you log in. Learn about:
| ► | The Panels and Views within the Entry Editor Layout. |
| ► | Menus and Buttons within the Entry Editor. |
At top left, your administrator may have inserted the name of the server you are using - see about server names here.
The Entry Editor window is divided into four panels, as shown in the screenshot below.
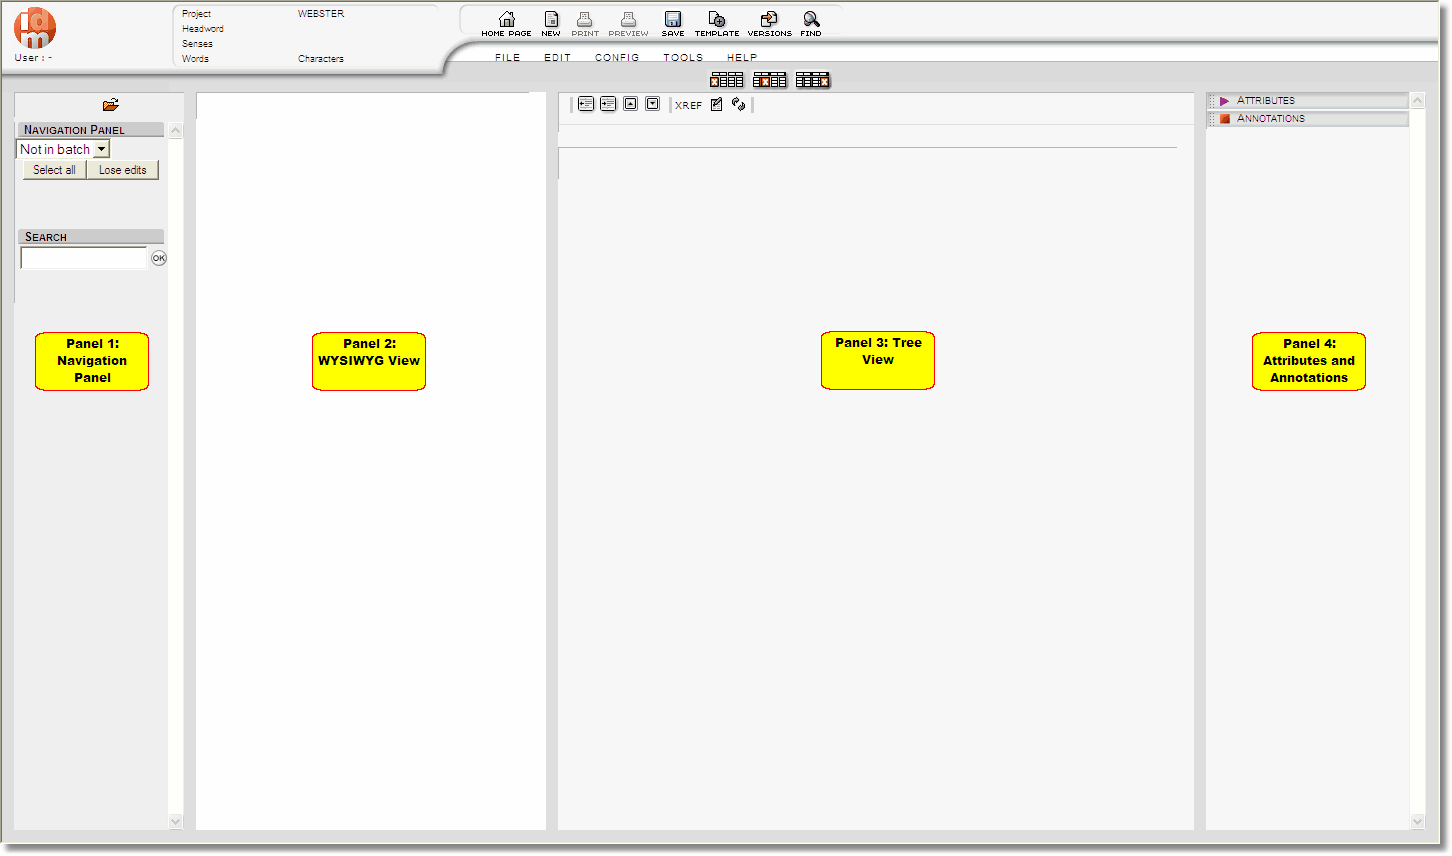 |
| Click to enlarge |
Panel 1: Navigation Panel
The navigation panel contains information about the entries in the currently selected batch:
| • | Has it been downloaded? The file icon to the left of the headword indicates that it has been downloaded. |
| • | The current entry: the entry now displayed in the tree view and editable displays a Table of contents. The TOC is configurable by the project manager. |
| • | Has it been changed? The file icon will turn pink if the entry has changed since being loaded in the editor. |
| • | The step status (unless the current entries are “Not in Batch” and thus downloaded outside the workflow system): the square to the right of the headword. |
| • | The selected entries: the pink background: the buttons Upload, Download, Toggle step status and Lose edits will work on these entries. |
| • | DTD compliance: the DTD error symbol will display to the left of the headword if the entry is not compliant. |
Panel 2: WYSIWYG View
A WYSIWYG view of the entries you are currently editing.
Panel 3: Tree View
The view of the currently selected entry showing XML tags and data; see Editing an Entry.
Panel 4: Attributes and Annotations
Information on the XML attributes and DPS Annotations of the currently selected entry; see Editing an Entry.
![]() Note: the size of the panels can be changed by adjusting (dragging) the borders. The sizes are remembered between sessions.
Note: the size of the panels can be changed by adjusting (dragging) the borders. The sizes are remembered between sessions.
See Entry Editor Menus and Buttons for more information.
You can hide the Navigation Panel, WYSIWYG panel, or Attributes panel by clicking on the appropriate icon (in the set of three just below the HELP menu). To show the panel again, click the icon again.
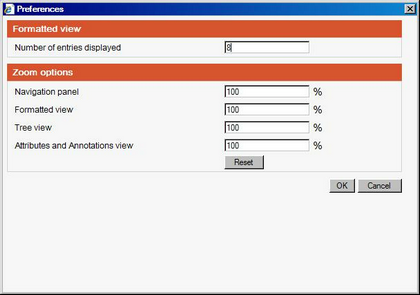
There are two sets of preferences:
| 1. | The number of entries to display in the WYSIWYG panel: default is a maximum of 8 entries. If entries are very big, this may impede performance so you might want to set it lower. If entries are small and you'd like to see more at a time, you can set it higher. |
| 2. | The font sizes can be changed for all 4 panels individually. This can also be done via a short cut: click in the panel you want to adjust, then CTRL-+/- (on the number keyboard) OR CTRL and scrolling the mouse wheel. |
Changing Display Configurations
The precise data content and layout of the Navigation, WYSIWYG, and Tree Panels are configured specifically for each project. Indeed, there might be more than one configuration available for a single project: for example, a WYSIWYG configuration designed to assist editing (colour coding to distinguish different types of data, hiding unchanging data, etc.) and another that mimics the final typeset layout (final colours, all data manifesting as in the final design, etc.). You can change display configurations through three options in the CONFIG menu:
| 1) | CONFIG/Entry Map: Select a display configuration for the Navigation Panel. |
| 2) | CONFIG/Tree View: Select a display configuration for the Tree Panel. |
| 3) | CONFIG/Formatted View: Select a display configuration for the WYSIWYG Panel. |