|
Working with Batches |
  
|
| Show/Hide Hidden Text |
|
Working with Batches |
|
| Show/Hide Hidden Text |
Before attempting any work with Batches, you should have a solid understanding of the DPS System's definition of the word Batch, as explained in the Project Management and Workflow section.
Batches are one of the most important tools for Project Managers as they enable you to efficiently manage workloads and schedules by assigning chunks of work and deadlines to editors.
This section explains how to:
| ► | Understand the Workflow Screen. |
| ► | Set Batch Steps to ensure editors stick to a consistent editorial plan. |
| ► | Set start and completion dates and manage the editorial schedules. |
| ► | Watch the status and progress so you are always one step ahead. |
| ► | Add comments so you communicate effectively with your team. |
| ► | Run Batch reports to check the status of your project. |
![]() Note: this section assumes you are already learned about Creating Tasks and Batches.
Note: this section assumes you are already learned about Creating Tasks and Batches.
With the exception of Removing an Entry from a Batch, Adding an Entry to a Batch and Moving Entries Between Batches all the work related to Batches takes place in the Workflow screen.
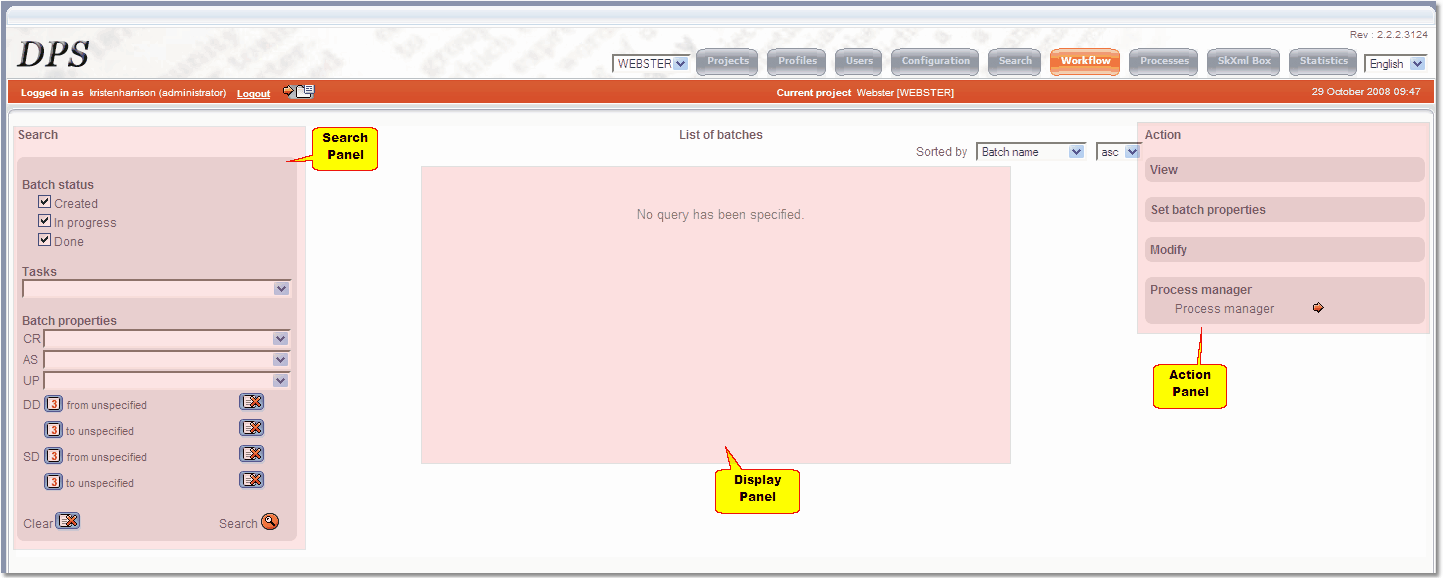
This screen can be accessed by clicking on the Workflow ![]() button at the top of the DPS homepage, which takes you to the main Workflow screen:
button at the top of the DPS homepage, which takes you to the main Workflow screen:
 |
| Click to enlarge |
This screen is organized in three main parts:
| 1) | The Search Panel on the left of the screen allows you to search for Batches in several different ways. |
| 2) | The Display Panel in the centre displays your search results. |
| 3) | The Action Panel on the right of the screen allows you to execute various actions relating to Tasks and Batches, such as View, Set Batch Properties, Modify and access the Process Manager. |
Use the Search Panel on the left of the screen to retrieve batches.The settings that appear in the Search Panel when you first enter the Workflow screen are the default settings. The default settings will retrieve a list of all Batches associated with your project. These settings look like this:
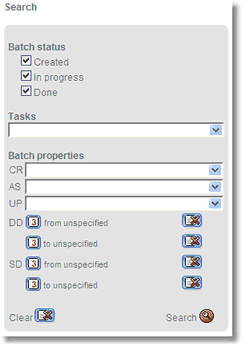
Click the Search ![]() button to execute the default 'all Batches' search.
button to execute the default 'all Batches' search.
Click the Clear ![]() button at any time to return to the default 'all Batches' settings.
button at any time to return to the default 'all Batches' settings.
The number of batches for a project can become very large, so the DPS provides various ways to filter your search results:
Batch Status |
Check or uncheck any of the three tick-boxes under 'Batch Status' to filter your results:
|
||||||
Tasks |
Find only batches that are constituents of a single task selected from the drop-down list. |
||||||
Batch Properties |
|
||||||
DD |
Find only batches with due dates within the specified range. You can set a beginning and/or an end to the range by clicking on the calendar icon (showing a '3'); you can clear the beginning and /or end date by clicking the appropriate 'clear' button (showing a cross). |
||||||
SD |
Find only batches with start dates within the specified range. You can set a beginning and/or an end to the range by clicking on the calendar icon (showing a '3'); you can clear the beginning and /or end date by clicking the appropriate 'clear' button (showing a cross). |
Any options you specify are cumulative: a batch must satisfy all of them to be found.
If you want all characteristics associated with a batch to display and to be exported, you should check the 'Show all characteristics" box BEFORE searching.
Click the Clear ![]() button at any time to return to the default settings.
button at any time to return to the default settings.
Click the Search ![]() button to execute your search.
button to execute your search.
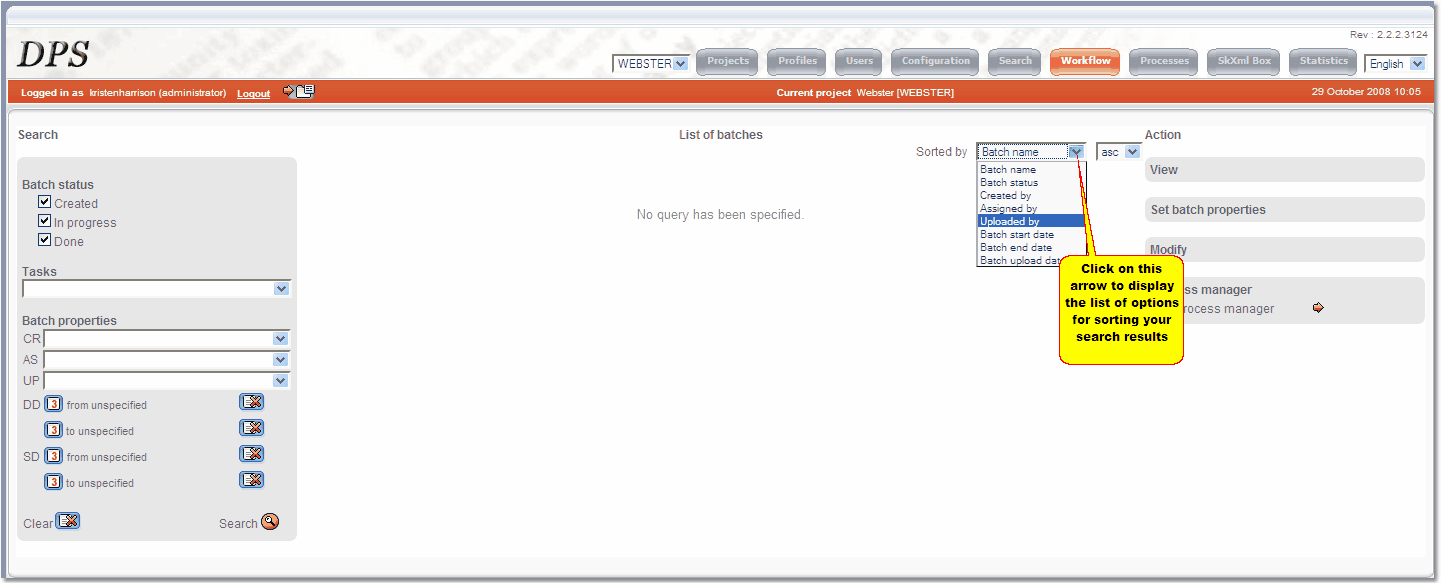
To Sort your search results:
| 1) | Click on the drop-down arrow next to 'Sorted by'. This will display the list of available options:
|
Batch name |
Displays results in alphabetical order, by batch name. |
Batch status |
|
Created by |
Displays results in alphabetical order, by name of the User who created the batch. See also batch selection CR above. |
Assigned by |
Displays results in alphabetical order, by the name of Users to which the batches are assigned.Unassigned batches will be displayed at the bottom of the list. Batches assigned to multiple editors are listed several times, once under each relevant editor. Please note: the 'by' in the label is a misnomer and should read 'Assigned to'. See also batch selection AS above. |
Uploaded by |
Displays results in alphabetical order, by the name of the User who has most recently uploaded entries from the Entry Editor. |
Batch start date |
Displays results in chronological order of the batch start date (see batch selection option SD above). |
Batch end date |
Displays batches in chronological order of the batch due date (see batch selection option DD above). |
Batch upload date |
Displays batches in chronological order of the most recent upload of entries from the Entry Editor. |
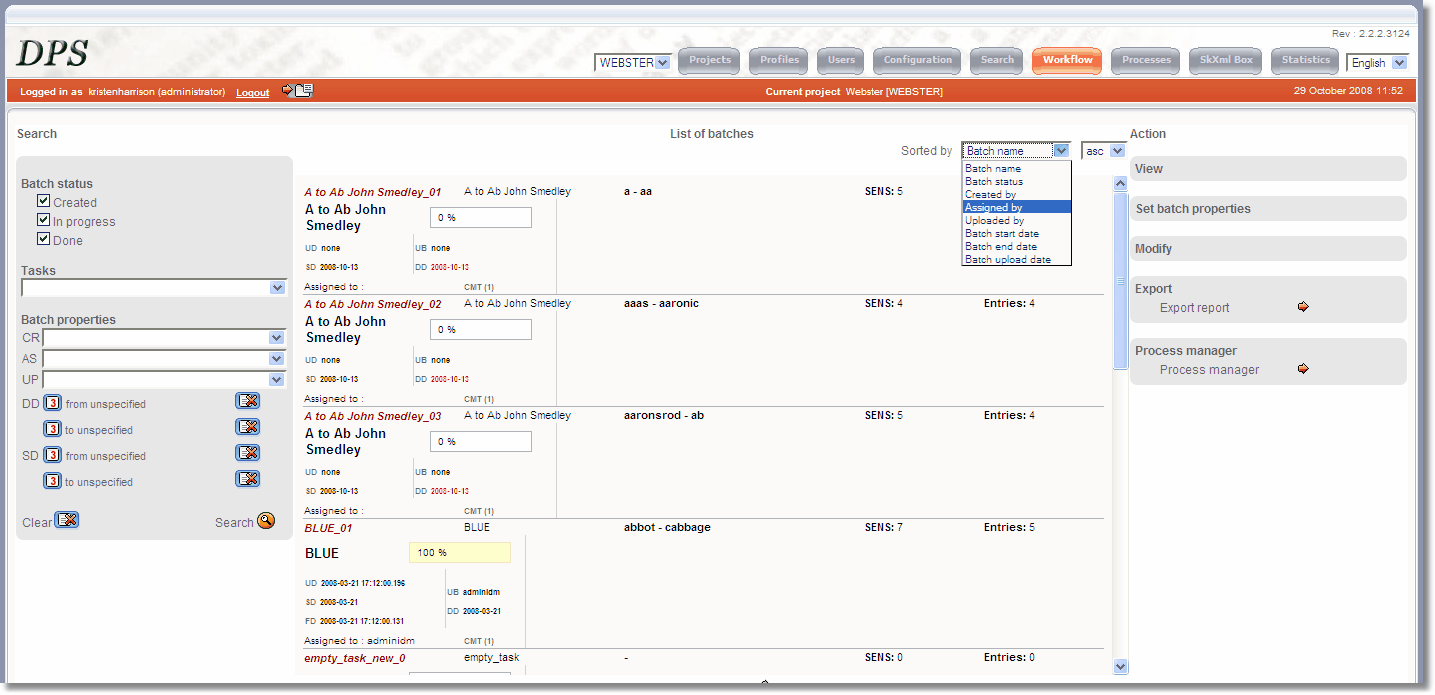
| 2) | Once you have selected an option the screen will automatically refresh the display. In this example we have executed a search for all Batches using the default settings, then we have selected 'Assigned by':
|
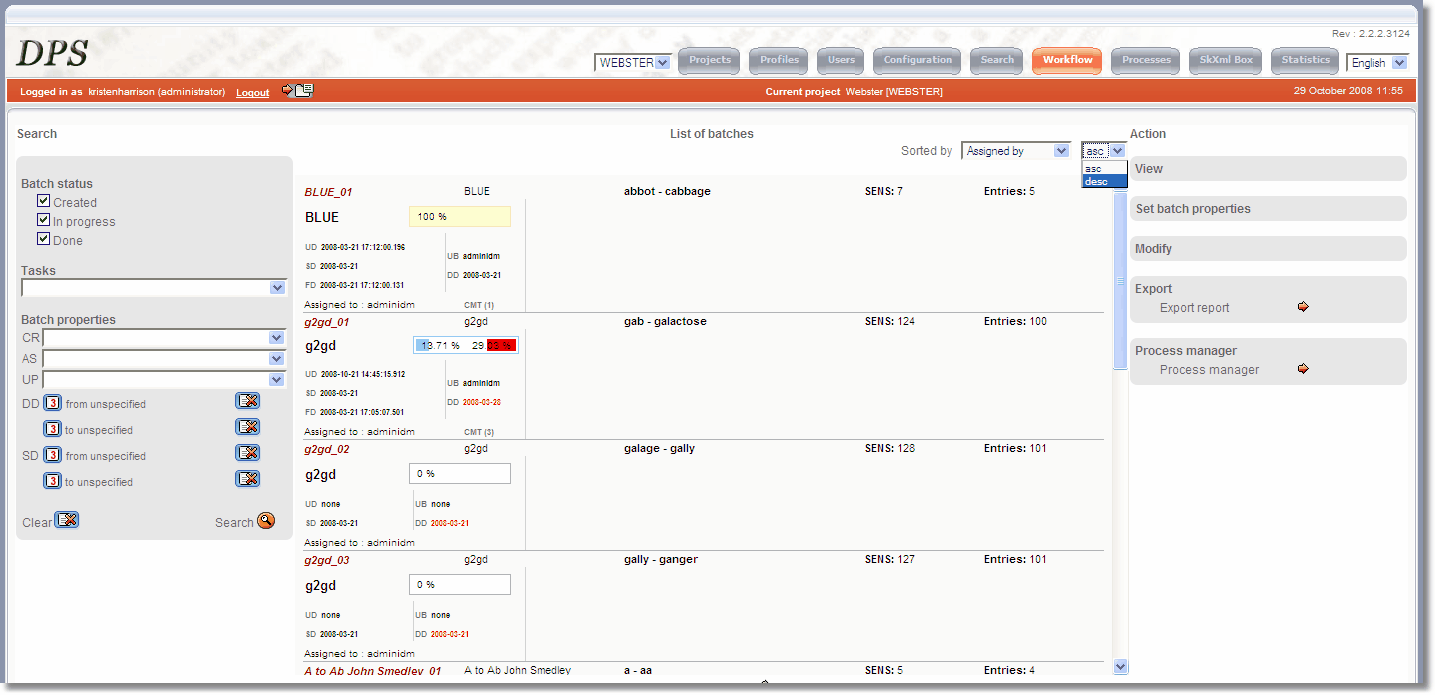
| 3) | The default results display is in ascending order (i.e. A-Z or earliest date first). This order can be reversed, to descending order (i.e. Z-A or latest date first) by changing 'asc' to 'desc' in the drop-down list to the right of 'Sorted by':
|
Removing an Entry from a Batch
To remove an entry from a Batch you need to first display the relevant entry in the WYSIWYG. You can do this with a routine Search, then once your results are displayed click on the WYSIWYG option in the View Panel. For detailed instructions see Searching for Entries and Viewing Entries.
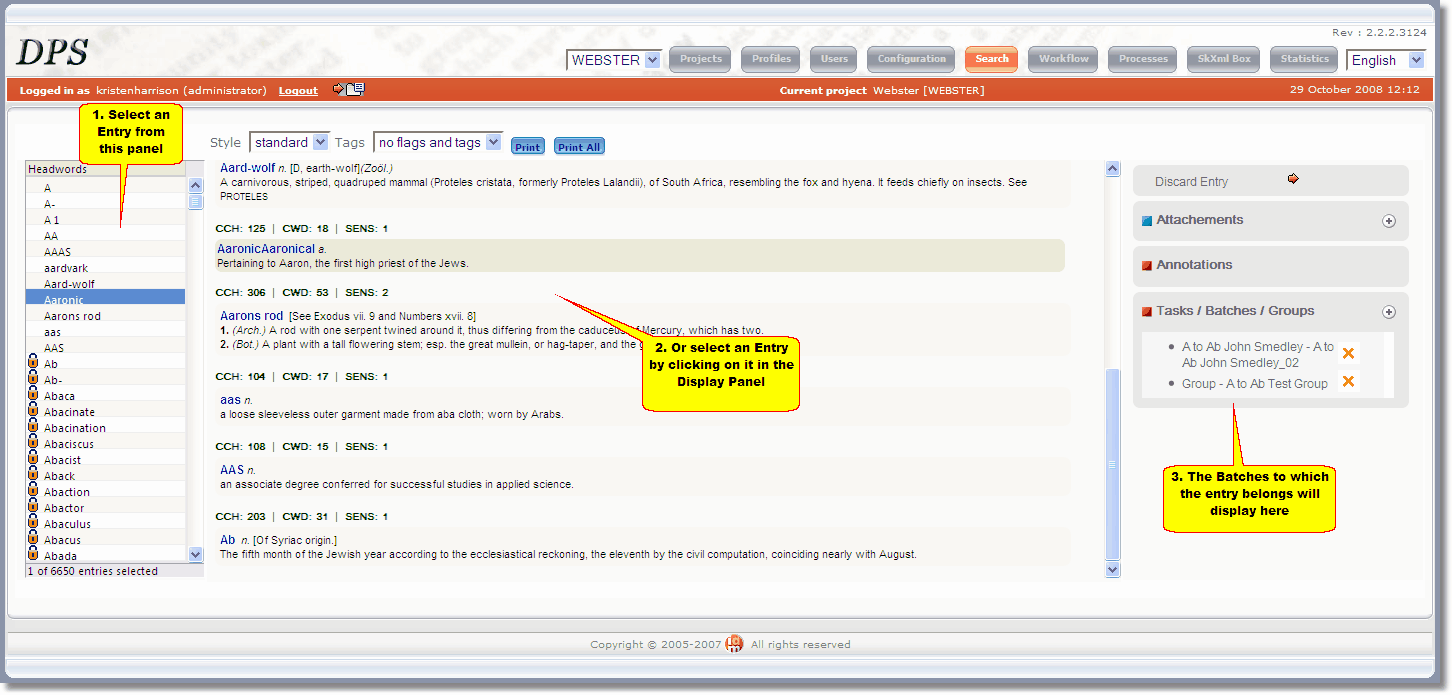
Once you have your entries displayed in the WYSIWYG View:
| 1) | Select the relevant entry. Any batches that this entry is currently a member of will be shown in the Tasks/Batches/Groups panel on the right of the screen:
|
| 2) | To Remove an Entry from a Batch, click on the red cross |
To add an entry to a Batch you need to first display the relevant entry in the WYSIWYG. You can do this with a routine Search, then once your results are displayed click on the WYSIWYG option in the View Panel. For detailed instructions see Searching for Entries and Viewing Entries.
Once you have your entries displayed in the WYSIWYG View:
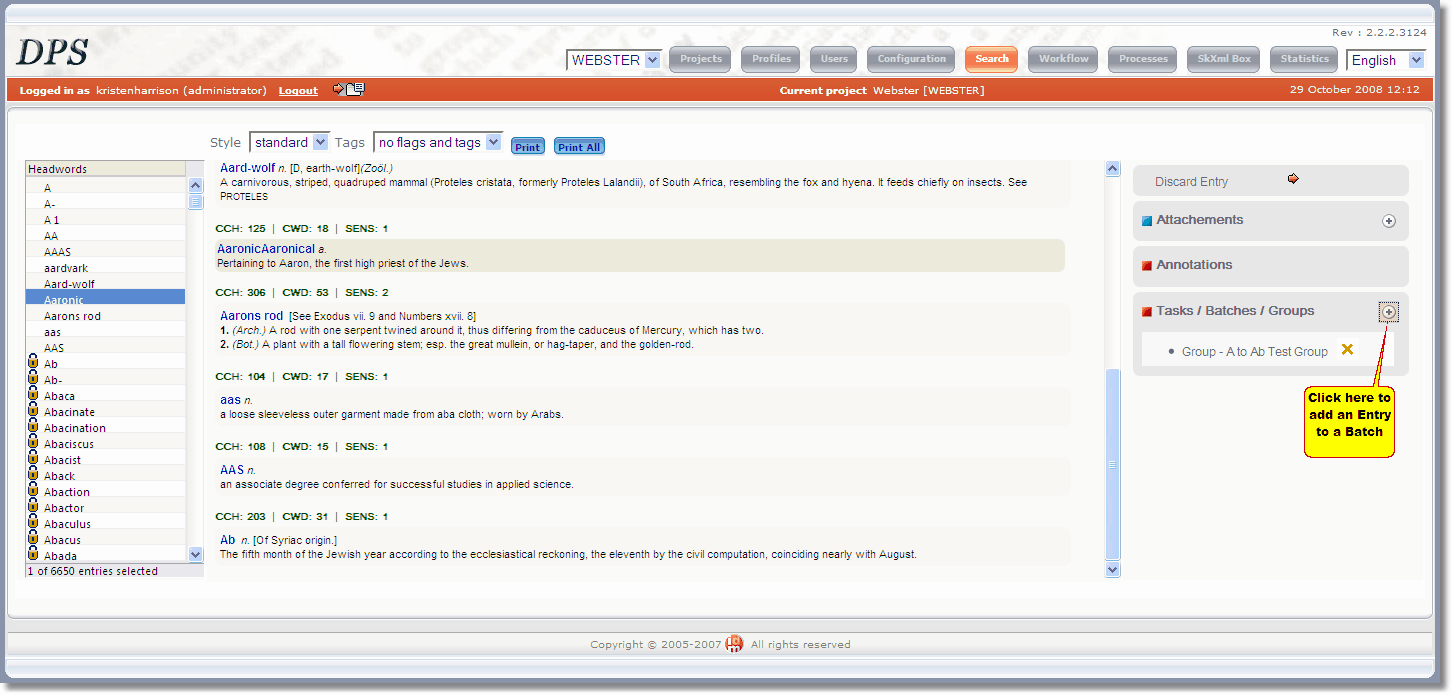
| 1) | Select the relevant entry. |
| 2) | Click the plus
|
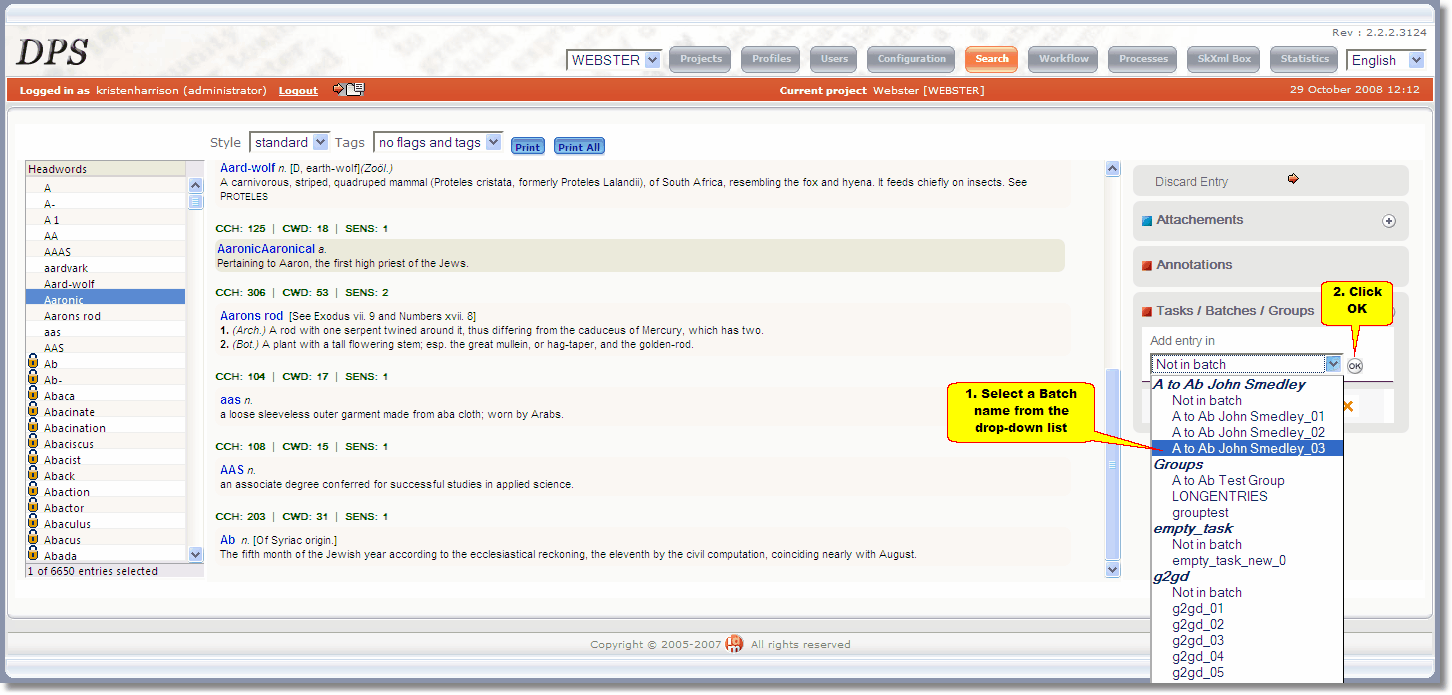
| 3) | A drop-down list of available group and batch names will appear. In this list, Batches are grouped under their Tasks. Select the appropriate batch name, then click OK:
|
![]() Note: you cannot assign an entry to more than one Batch with the same Task. If you do this the new assignment replaces the old: i.e. you will move the entry from the old batch to the new batch.
Note: you cannot assign an entry to more than one Batch with the same Task. If you do this the new assignment replaces the old: i.e. you will move the entry from the old batch to the new batch.
Moving Entries Between Batches
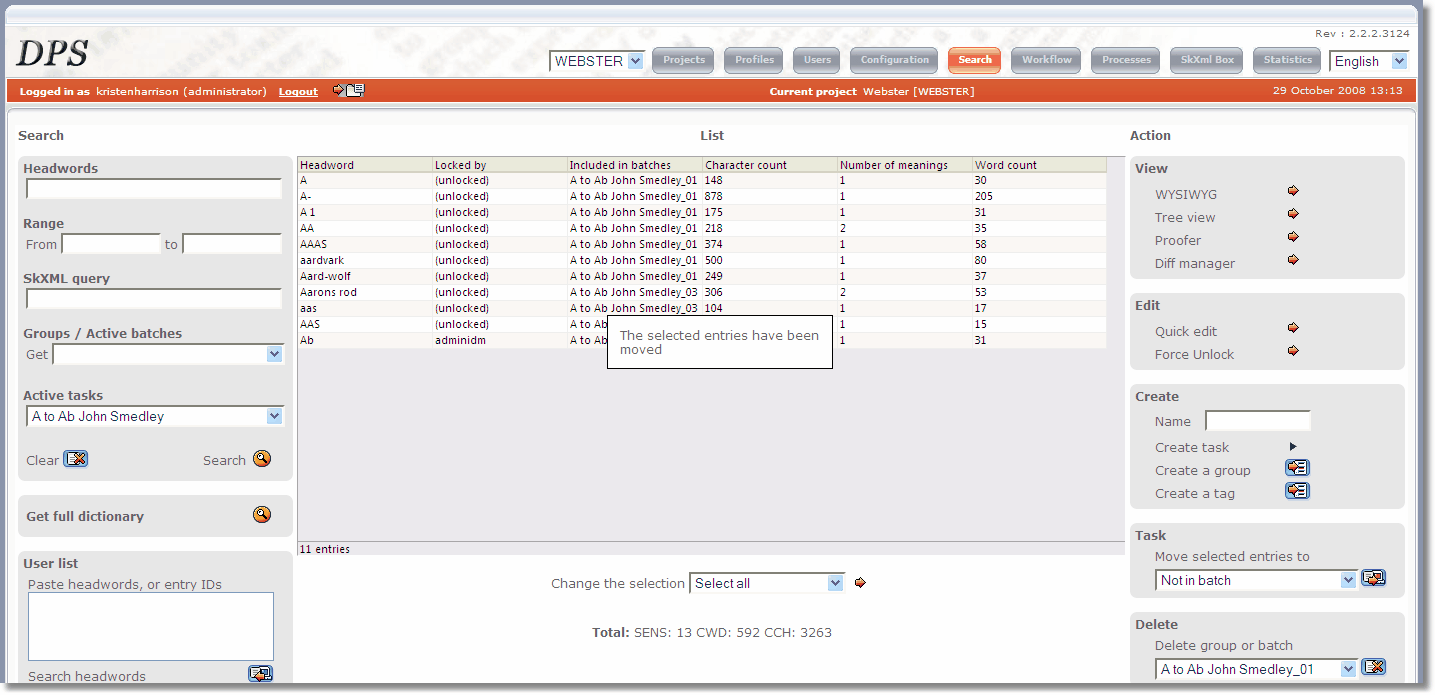
Entries can be moved between Batches of the same Task. To do this you first need to conduct a search for the relevant entries (see Searching for Entries ) and proceed from the search results screen:
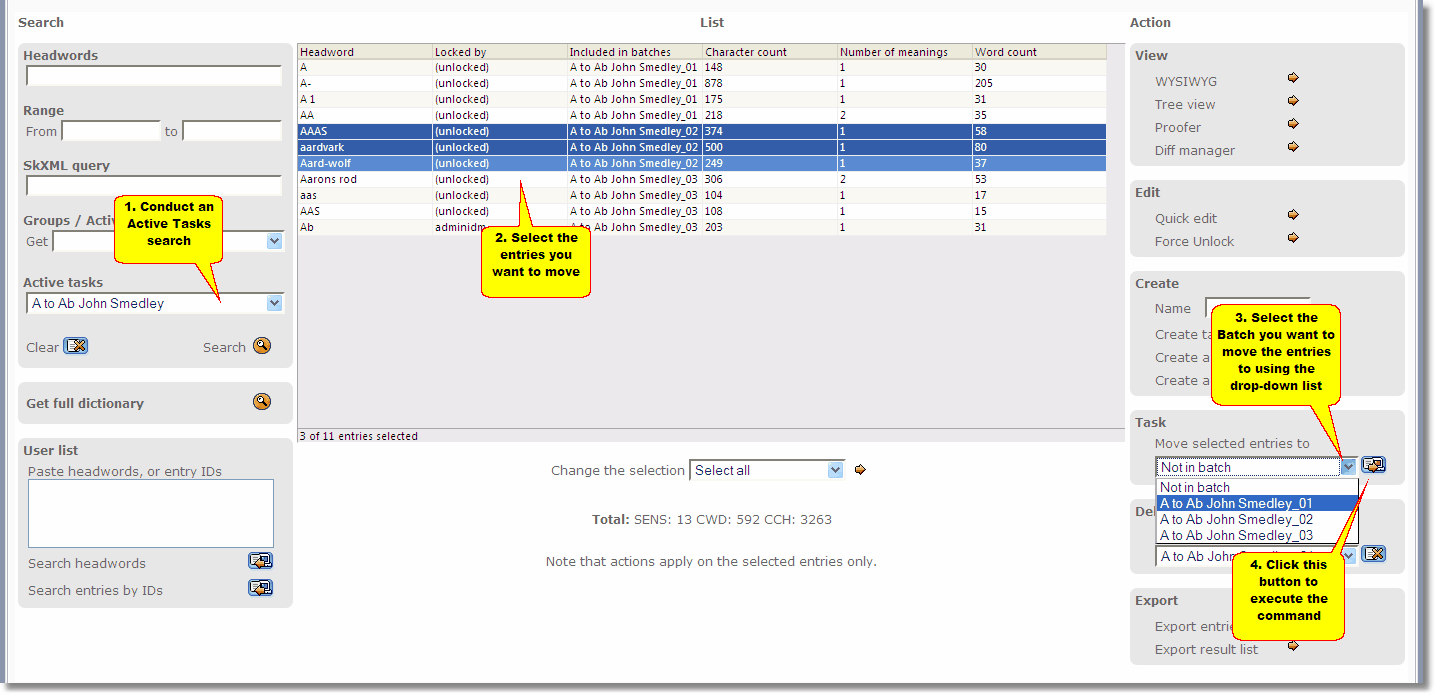 |
| Click to enlarge |
| 1) | Search for all the entries in a task using the Active Tasks method. For detailed instructions see Active Tasks Search. |
![]() Note that the option to move entries between batches is only available if you use the Active Tasks search method.
Note that the option to move entries between batches is only available if you use the Active Tasks search method.
| 2) | Select the entry or entries you wish to move. |
| 3) | Select the Batch to which these entries should be moved using the drop-down list. Only those Batches within the selected Task will be listed. To remove an entry or entries from all Batches of the selected Task, select option 'Not in batch'. |
| 4) | Click the |
| 5) | You will see a confirmation message 'The selected entries have been moved':
|
The unit of work that is assigned is a single Step of a single Batch. To assign a Step to one or more editors you first need to use the Search Panel on the left of the Workflow screen to retrieve your batches (see Retrieving Batches). Once you have your batches:
| 1) | Select the step by clicking on it. The step will be highlighted. |
| 2) | In the Set Batch Properties panel, click on arrow |
| 3) | A list of the users defined for this project appears. Tick the editor(s) to whom the step should be assigned. |
| 4) | Click the Apply button. |
You may change the editors assigned to a Step at any time. However, you will need to ensure that any editors removed from the Step have Unlocked any entries from this Step.
Note: an editor de-assigned from a batch will still be able to continue working on any entries they have already uploaded to the database but have not yet been signed off.
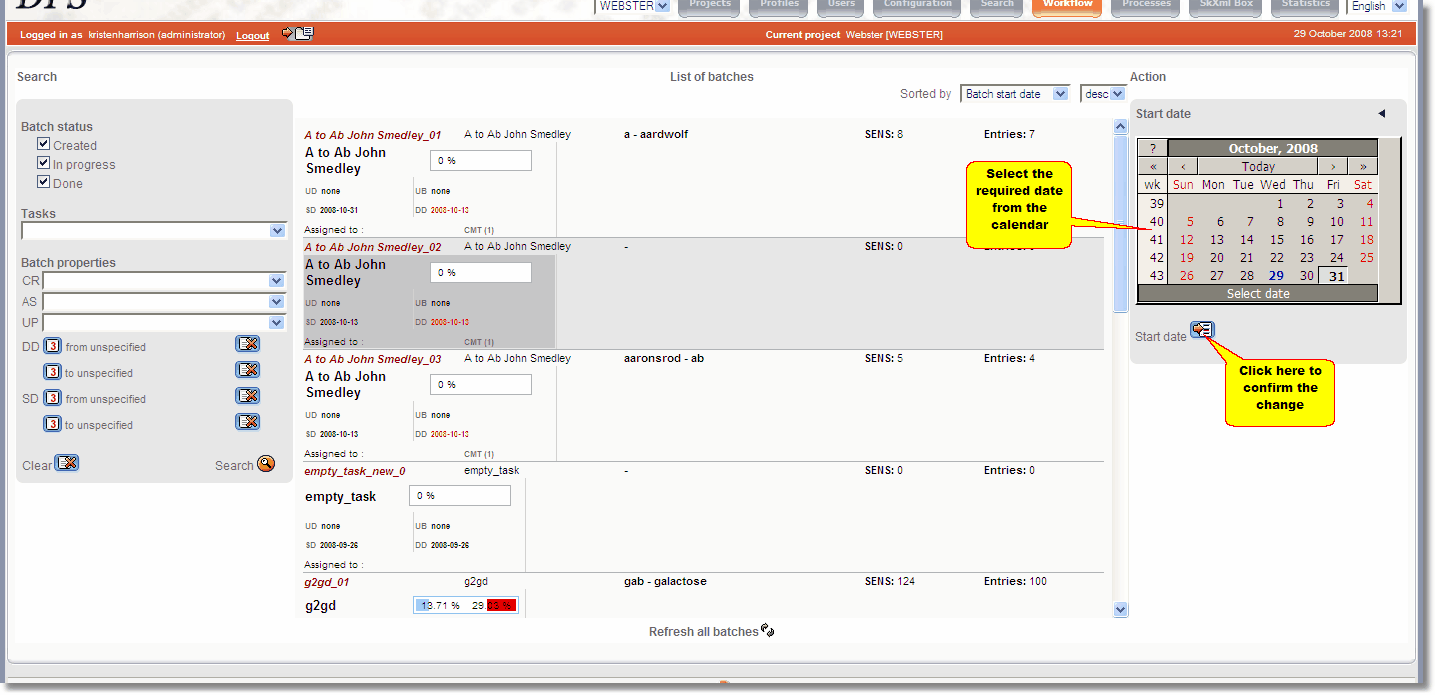
The default start date for any Step is the date it was created. You may wish to change the start date (e.g. set a future date) to specify when a Step should be commenced. To do this you first need to use the Search Panel on the left of the Workflow screen to retrieve your batches (see Retrieving Batches) then:
| 1) | Select the Step by clicking on it. The Step will be highlighted (see screenshot in step 2) below). |
| 2) | In the Set Batch Properties panel, click on the arrow
|
| 3) | A calendar will appear. Click on the chosen date (see screenshot in step 4) below). |
| 4) | Click the 'Start date'
|
![]() Note: you can change a Step's start date at any time.
Note: you can change a Step's start date at any time.
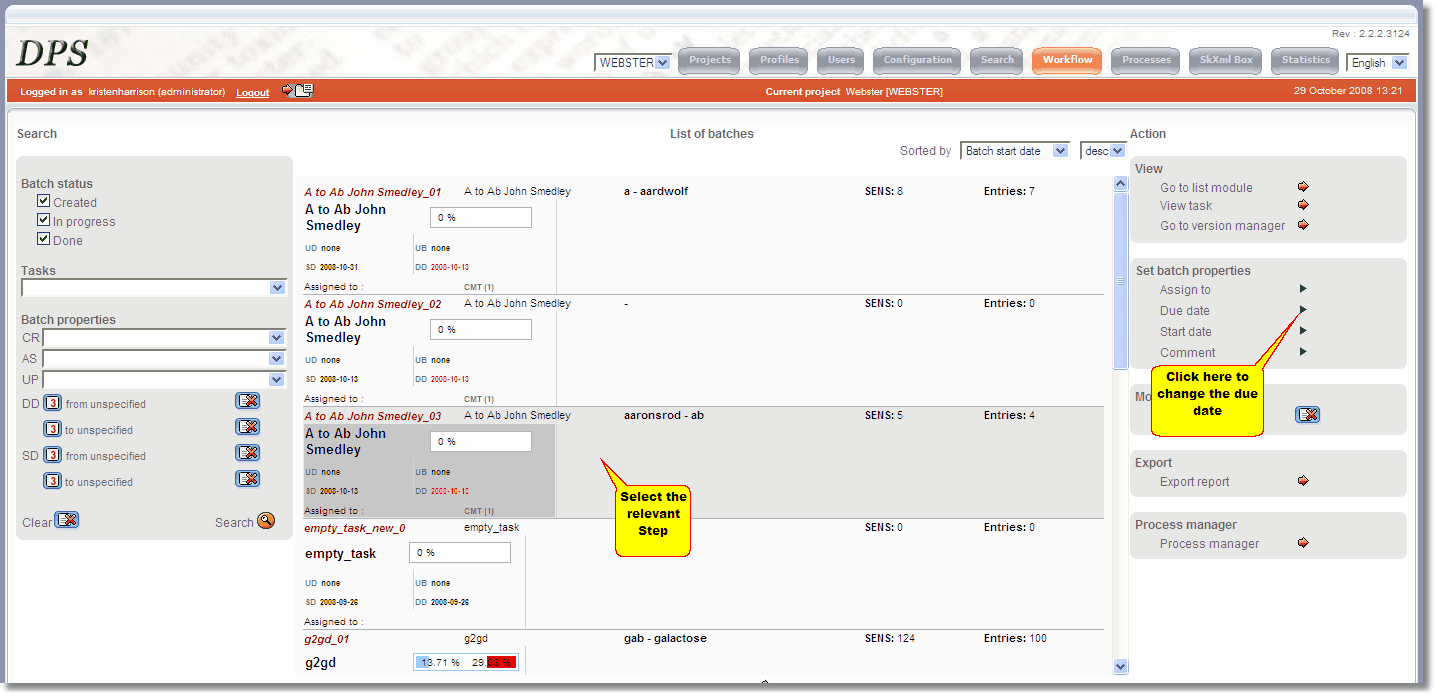
The default due date for any Step is the date it was created. You may wish to change the due date (e.g. to give an editor more or less time). To do this you first need to use the Search Panel on the left of the Workflow screen to retrieve your batches (see Retrieving Batches) then:
| 1) | Select the Step by clicking on it. The Step will be highlighted (see screenshot below). |
| 2) | In the Set Batch Properties panel, click on the arrow
|
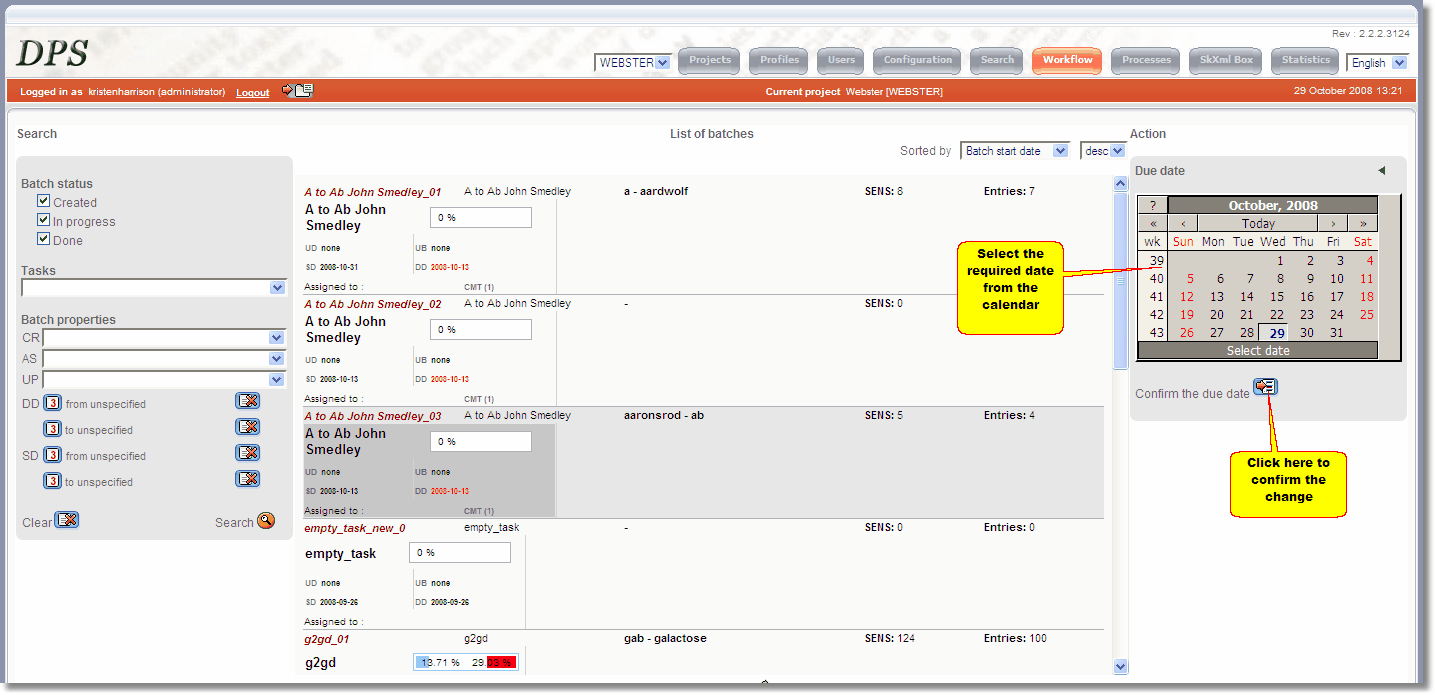
| 3) | A calendar will appear. Click on the chosen date (see screenshot in step 4) below). |
| 4) | Click the 'Confirm the due date'
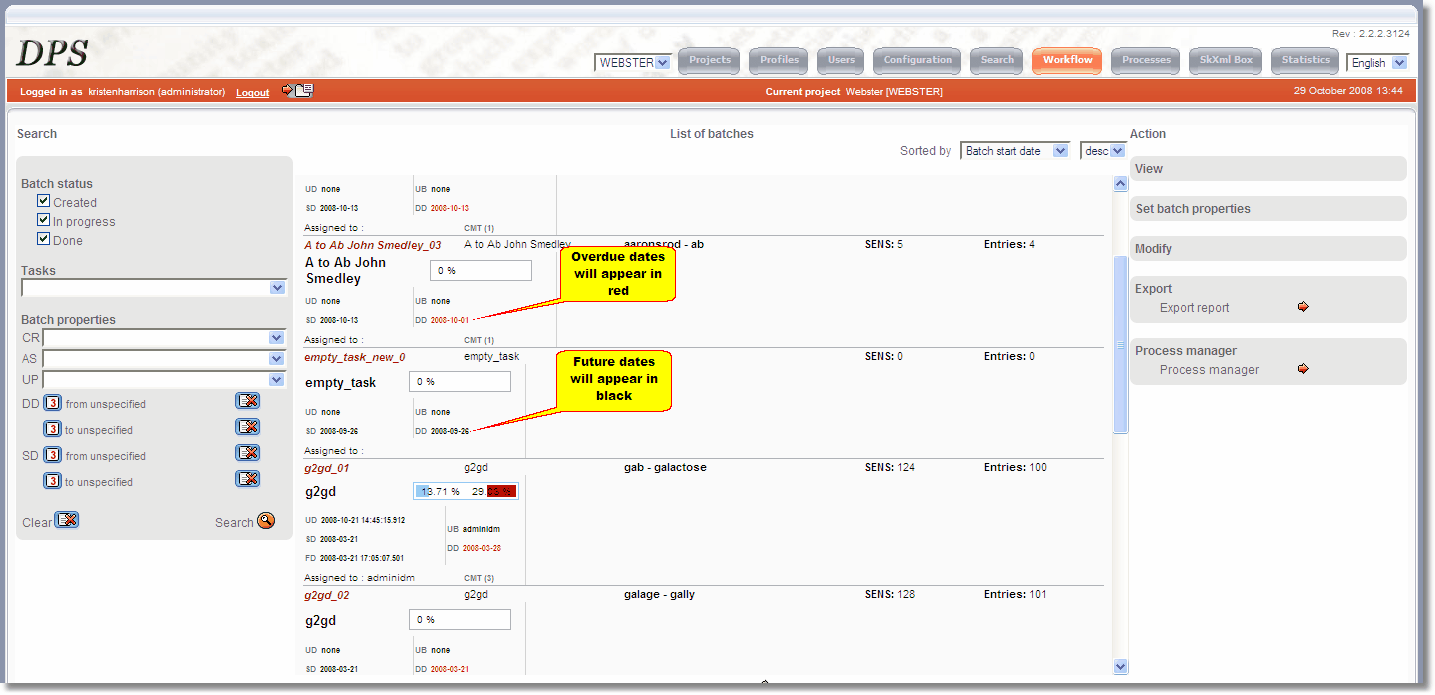
If you change the due date to a date in the past (therefore making the batch step overdue) the new date will display in red, both on your screen (see screenshot below) and on the relevant editor's Entry Editor home page:
|
![]() Note: you can change the due date at any time.
Note: you can change the due date at any time.
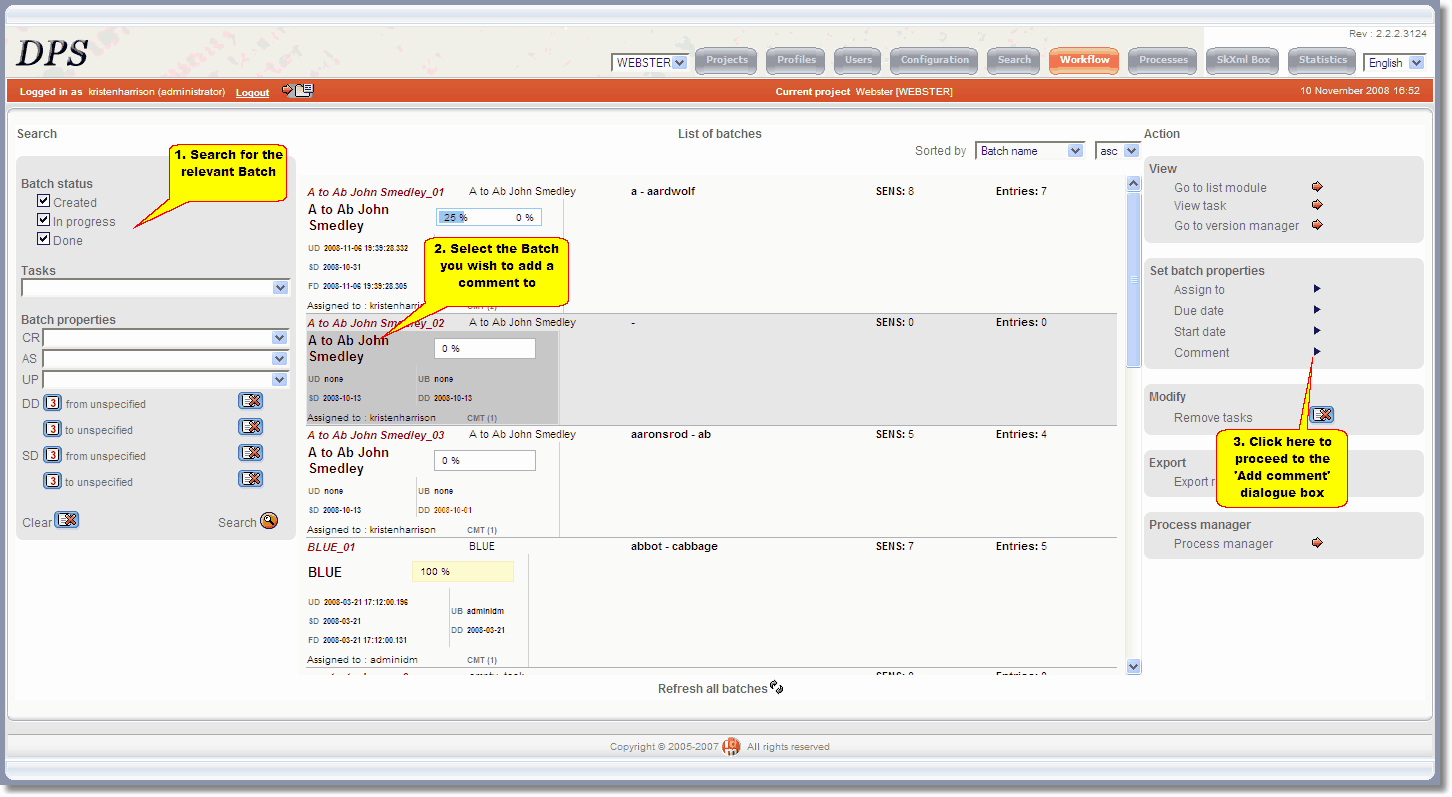
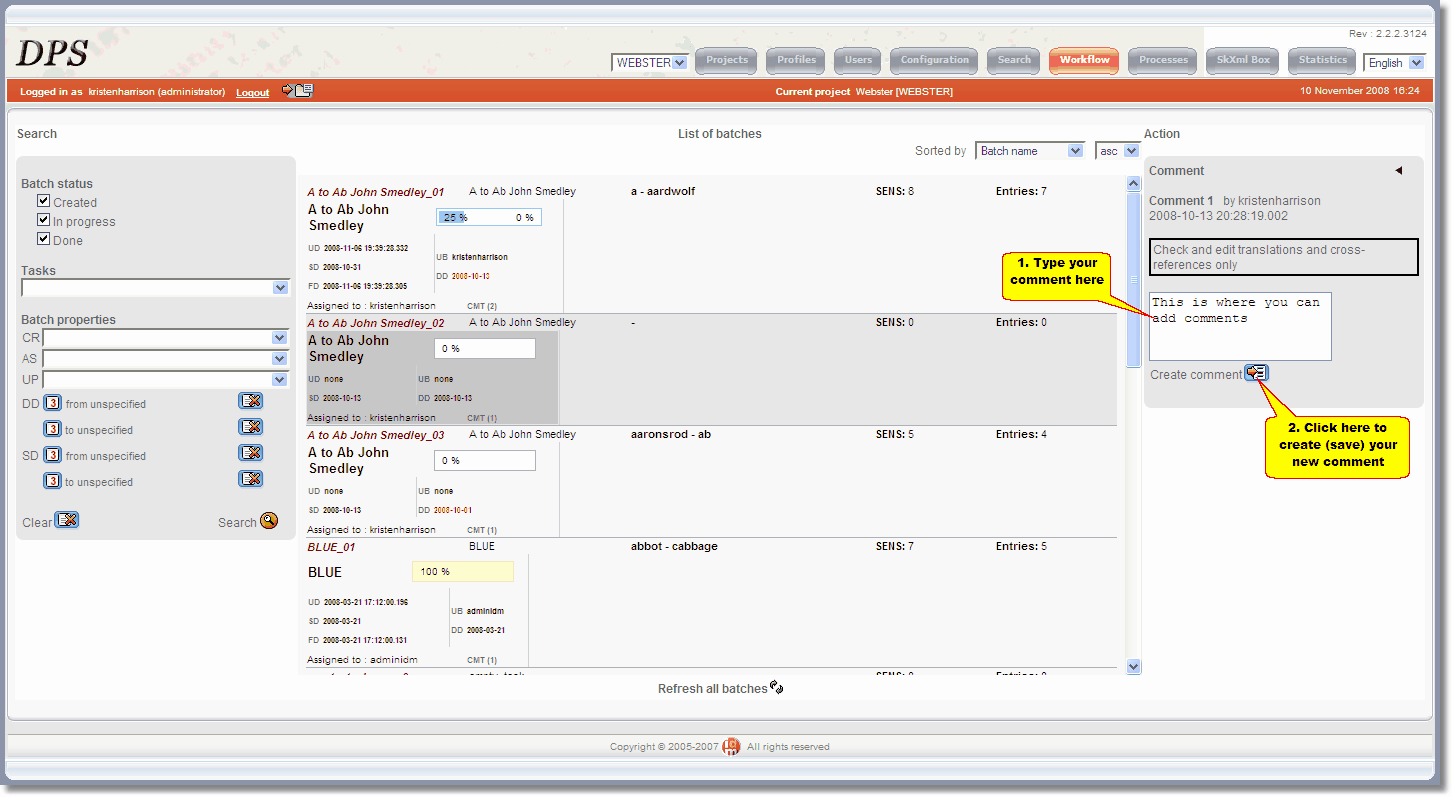
Comments are a useful way of communicating with Editors and Lexicographers. To add a comment you first need to use the Search Panel on the left of the Workflow screen to retrieve your batches (see Retrieving Batches) then:
| 1) | Select the step by clicking on it. The step will be highlighted. |
| 2) | In the 'Set Batch Properties' panel, click on the arrow
|
| 3) | A text box and a note of any existing comments will appear. Type your comment in the text box:
|
| 4) | Click the 'Create comment' button |
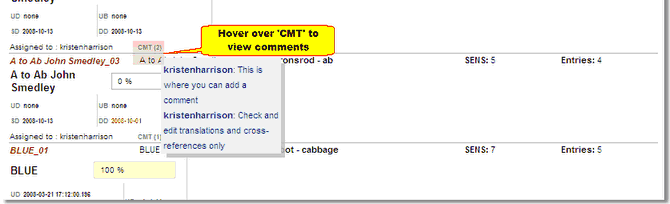
Batch comments are added to whatever comments were there already. They can be viewed in the 'Create comment' dialog or as a tooltip when the mouse hovers over the ‘CMT’ (comment) associated with the batch in the search result:
Changing the Properties of Several Steps
You can change the properties of several Steps from one or more Batches in a single operation:
| 1. | Select one of the steps you wish to change by clicking on them (press 'CTRL' as you click to select multiple steps). |
| 2. | Use the 'Set batch properties' menu in the Action Panel to change a property. The instructions are exactly the same as described above (see Assign a Batch Step, Specify a Due Date, Specify a Start Date and Add a Comment). The change will be applied to all the steps. |
After you have retrieved on or more Batches by searching, their entries in the List of Batches column shows several details about their progress:
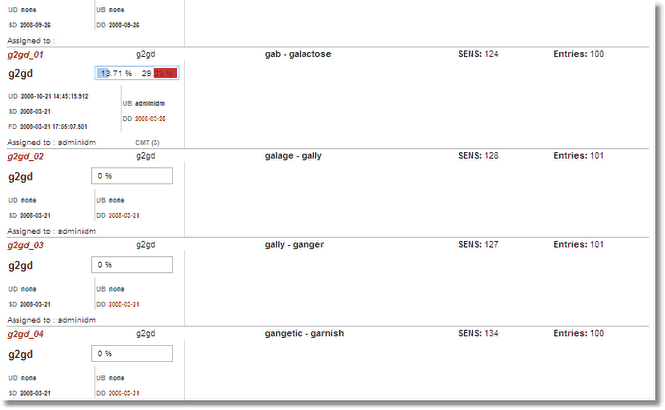
For each step, these details given are:
| 1) | Progress bars showing: |
| a) | Proportion of entries submitted by the editor(s) but not yet signed off (red bar, right-hand percentage). |
| b) | Proportion of entries signed off (blue bar, left-hand percentage). |
| c) | When the step is complete (all entries signed off), '100%' is displayed on a yellow background that fills the whole of the progress bar. |
| 2) | UD (update date): the date and time of most recent update (i.e. upload of one or more entries from the Entry Editor). |
| 3) | UB (updated by): the user who performed this update. |
| 4) | SD (start date): the start date of the batch step. |
| 5) | DD (due date): the due date of the batch step. If this date is already in the past – i.e. the batch step is overdue – it manifests in red. |
| 6) | FD (finish date): the date when the batch step was finished: that is, when all entries were signed off. This date only manifests if the batch step has been completed. |
| 7) | Assigned to: the user(s) to whom this batch step is assigned. |
| 8) | CMT: gives access to batch comments as a tool tip. |
![]() Important Note: to view up-to-date statistics, you must click the Refresh all batches button at the bottom of the screen.
Important Note: to view up-to-date statistics, you must click the Refresh all batches button at the bottom of the screen.
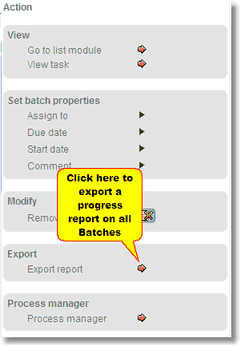
You can export a summary report of all the displayed batch steps to your computer by clicking the arrow next to Export Report:
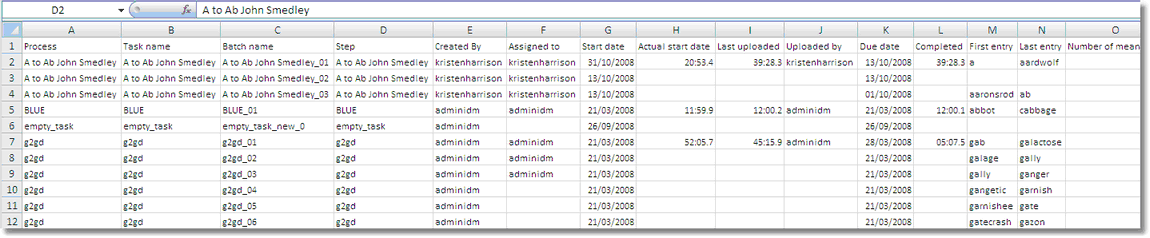
The report is a tab-delimited text file, one line per batch step, with the following fields in each line:
Process Task name Batch name Step Created By Assigned to Start date Actual start date [i.e. the date of the first update] |
Number of meanings accepted Last uploaded Uploaded by Due date Completed First entry Last entry Number of meanings Number of meanings submitted
|
This file can easily be loaded into a spreadsheet or database. Here is an example of a batch report opened in Microsoft Excel:
Other (less common) Batch operations are available in the Action panel on the right of the screen. This panel appears when you have selected the Batch Step.
Other Batch operations are:
Go to list module |
Opens the Batch's entries in the Search screen to give you access to the other options there (see Working with Search Results). |
View task |
Shows a progress summary for the whole Task of which the Batch is a part. |
Go to version manager |
Opens the Batch's entries in the Version Manager (see The Review and Sign-Off Procedure). |
Remove task |
Deletes the Task and all associated information (definition, progress, etc.). However, any entries altered as part of this task will not be rolled back to their former state. |